Snow Crystal Morphology

North Cascades Institute logo
Snow Crystal Morphology
Note: This lesson requires students have access to a snowy location.
Download a copy of this lesson:
Learner Objectives
- Participate in kinesthetic activity to visualize the different formations of snow crystals based on temperature.
- Explore snow crystals with magnifying loupes and share their observations.
Lesson Goals
- Understand how snow crystals form and what environmental factors influence crystal morphology
- Make connections between the microcosm of crystals and the larger snowpack and what that means for snow density and water content.
Materials
- Magnifying loupes
- Snow Crystal Card or other plastic surface
- Nakaya Snow Crystal Diagram by Kenneth Libbrecht
- Field journal or blank paper (optional)
Assessment
- Students will demonstrate participation through sharing their crystal observations.
- Additional assessment is embedded in the conversations as they progress through the activity and the day. Inquiry-based teaching techniques are recommended. Questions posed to the group regarding crystal formation, weather, and snowpack will lead to answers and further discussions the educator can use to assess student connection and content understandings.
Time Frame
- 20-30 minutes
Key Terms
- Atmospheric Particulate Matter: Microscopic solid or liquid matter suspended in the Earth's atmosphere. Solid particulates form the nucleus, or center structure, of snow crystal and water droplets.
- Hexagon: A six sided figure. Snow crystals form in this shape.
- Humidity: The amount of water vapor in the air.
Background Information
Snow crystals form when a tiny speck of material in the atmosphere becomes very cold, followed by water vapor adhering to it. The speck of materials can be ash, salt, pollen, soil, dust or even bacteria. The water vapor that freezes to this particulate forms a hexagonal plate with 6 branches as it makes its way down to the ground. The shape of the crystal depends on the humidity and temperature in the atmosphere (as seen in the snow crystal diagram below).
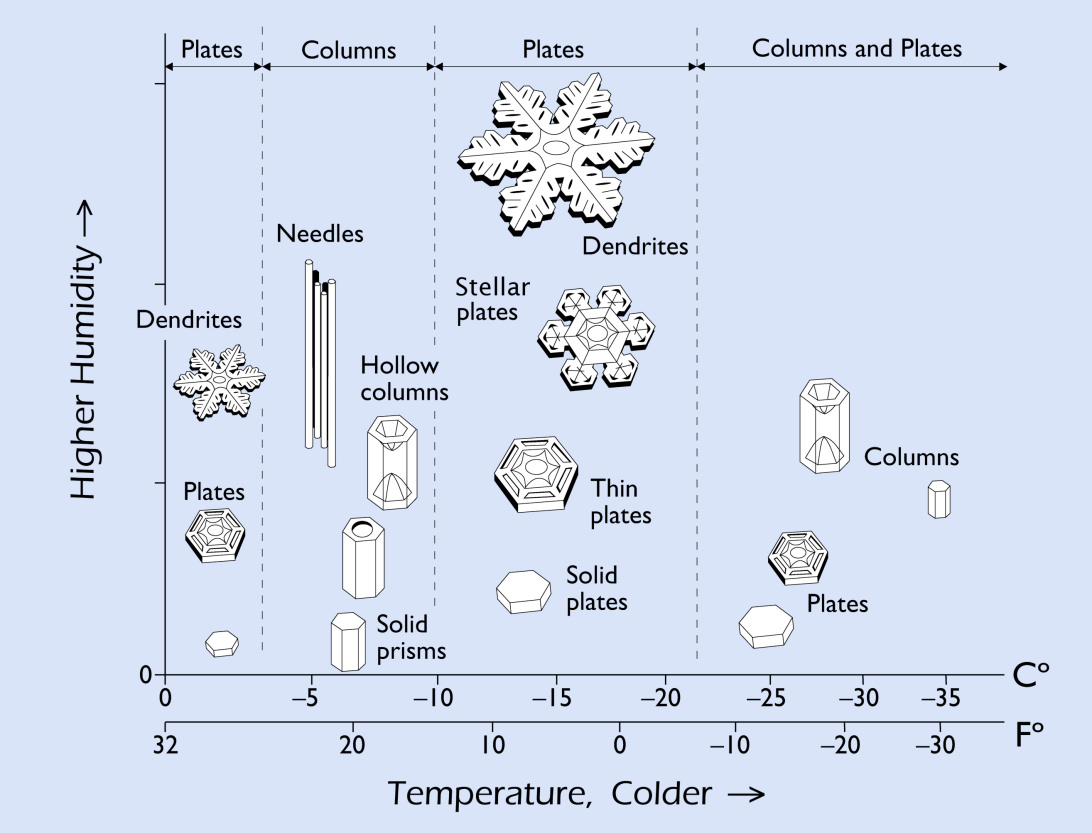
Nakaya Snow Crystal Morphology.
View the Snow Crystal Morphology Diagram | SnowCrystals.com
Snow crystals are not only different in their formation, but also different as they have settled throughout various depths of the snowpack. They change as they become buried in the snowpack by more recent snowfall. The buried snow crystals are affected by water vapor molecules flowing through the snowpack, attaching to or detaching from these snow crystals. Snowflakes also change due to mechanical damage or to the pressure within the snowpack they experience.
Snow Crystal Formation Activity
Introduce the concept of a snow crystal.
Ask students: Describe what you imagine a snowflake looks like? How many sides?
Ask them to think about the classic paper cut-out snowflakes some of them may have made before. Tell them that real snow crystals actually look very similar to this.
Ask students:
a. What do you think happens to a snowflake once it lands on the ground?
b. Do you think the snow under your feet looks like the snowflakes that fall out of the sky?
Encourage students to dig down where they are standing to compare different snow. Suggest students hypothesize why snow crystals they find may or may not look different.
Invite students to stand in one large circle (At least seven participants are needed for this activity).
Form a hexagonal snow crystal: Ask a student to volunteer as the dust, bacteria, or algae particulate. Instruct them to stand in the center of the circle. Tell the students this particulate is floating way up in the atmosphere and is beginning to get very cold. As the temperature drops, invite six participants to become frozen water molecules, and reach out and attach one of their arms to the center particulate. A hexagonal snow crystal has now formed! Any additional participants and attach to the students who represent the water molecules, extending the crystals in size.
Change into a rounded snow grain: One at a time, have any students attached to the original six water molecules detach from the arm and reattach to the center dust particle. Keep doing this until the group has a rounded figure instead of a star-shaped one. Point out that rounded snow grains stick together very well! Rounded grains form by destructive processes. Water vapor molecules break off and reattach toward the center of the crystal. These usually form when temperature is warmer and even throughout the snowpack or throughout a specific layer in the snowpack.
Change into an angular snow grain: Start over with your original dust particulate and one group of three to six students attached as the crystal’s arms. Encourage additional students (as water vapor molecules) to attach themselves in all different, chaotic directions. The crystal will become more angular and irregular the more people (water vapor molecules) are added. Point out that angular snow grains do not stick together very well at all! Angular grains form by constructive processes that usually coincide with colder temperatures. The crystals are generally poorly bonded, weak and unconsolidated.
Create melt-freeze situation: Ask students to form two different snowflakes with 4-7 students each. Have any leftover students “flow” between the two snowflakes (as melted liquid water), attaching the two snowflakes together. Point out that melt-freeze can occur anywhere in the snow pack, but often occurs near the top where the snow is warmed by the sun. Melt-freeze strengthens the snowpack by cementing grains together and forming well-bonded layers.
Snow Crystal Observations Activity
Share with your students the Nakaya diagram. This visual highlights differences in snow crystals based on temperature and humidity. As you pass out the diagram for all to see, have students predict what shape they will observe in snow crystals from the surface of the snowpack. Encourage them to think about some of the weather observations they have made and how it will influence what they discover.
a. Pull out the snow crystal cards from your instructor kit. Ask a student to demonstrate how to use one of these snow cards to delicately gather a thin layer of surface snow from the side of the trail.
b. Pass out the magnifying loupes to students. Invite them to place the magnifying loupe on top of the snow crystals. Warn them to be careful not to breathe on the sample, as it will quickly morph and melt! Encourage students to make observations and then pass along the instruments so all students can participate.
Ask students to share their observations.
Possible options for sharing include:
- Pair Share: Students can partner up and verbally share their observations with each other.
- Draw: For individual exploration, have students to draw an up-close perspective of their crystals. Give them the option to share to the group or in pairs afterwards.
- Physical Representation: Task the students to work all together to make the shape of the crystals they see with their bodies, similarly to the primer activity. This can be fun and goofy!
Check for understanding and further the students’ critical thinking.
Ask students:
a. What do the observations we made about snow crystals tell us about the temperature and humidity (moisture in the air) right now?
b. Where does the heat come from when the snowpack is warm?
Answers may include:
a. Snowpack can be warmed by the earth from below! The earth’s core of molten rock causes the earth to radiate some heat, which warms the ground.
b. Snow is also warmed by direct sunlight from the top of the snowpack.
License and Attribution
Attribution
Adaptation of Nakaya Snow Crystal Morphology Diagram copyright Kenneth Libbrecht. All rights reserved. Used with permission
License

CC BY logo
Except
where otherwise noted, this work by North Cascades Institute is licensed
under a Creative Commons AttributionLicense. All logos and
trademarks are the property of their respective owners.
(www.ncascades.org)
If this work is adapted, note the substantive changes and re-title, removing any North Cascades Institute logos. Provide the following attribution:
This resource was adapted from Snow Crystal Morphology by North Cascades Institute and licensed under a Creative Commons Attribution 4.0 International License. Access the original work for free in the ClimeTime group on the OER Commons Washington Hub.