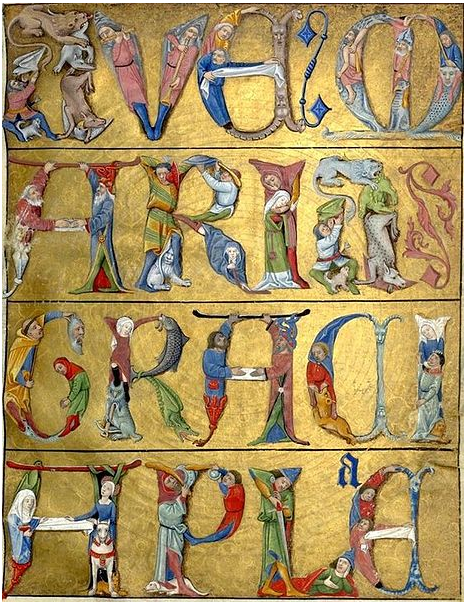
Illuminated Text
Illuminated Text
(art + history; art + literature)
Illumination is the decorating of books or manuscripts with ornate lettering, icons and designs with luminous color and precious metals. During the Middle Ages, literacy was rare, so dedicated scribes created illumination to guide the viewer through the document. It was their artistic goal to provide comprehesion, beauty and honor to the pages they were writing because, in most instances, they believed they were copying the words of God. Thousands of examples have survived from Europe and the Middle East with stunning ornamental type and illustrative scenes.
Gilding with gold or silver was one of the methods used to illuminate a page. Thin sheets of metal called “leaf” were applied with adhesive to a specific area. In some instances, an entire page is gilded, with text and illustrations added on top of the leaf. In other instances, the metal is used to emphasize a letter or portion of an integral design or image. With the use of easy and safe Simple Leaf, students can follow this lesson plan to create an illuminated letter with the luster of real gold, then surround it with decorative patterns and images drawn with colored pencil. Materials stated will make 2-1/2" letters.
Grade Levels 5-12

Illuminated Text Example
Objectives
- Students will gain an understanding of how books began to be produced and how information through the written word was passed on for centuries
- Students will describe ways in which art supports literature through decoration and illustration to provide better comprehension and added value to the written word
- Students will use principles of contrast, unity, movement and balance to provide artistic ornamentation to text
- Students will have the experience of learning an ancient decorative gilding technique
Recommended Resources
- Medieval Designs sourcebook (71300-1003)
- The Calligrapher’s Bible (71120-1001)
- Dover Medieval Ornament (71306-1011)
Preparation
1. Provide lettering styles for reference or to trace. A computer can be used to print out fonts, sized 2-1/2" high. Or, have students design their own initiative or a capital letter to begin a selected piece of poetry or prose. View examples of handwritten calligraphy.
Process
1. Using a pencil, trace or draw the letter onto the Double Tack release paper. Letters do not need to be reversed. Use scissors to cut out carefully.
2. Place the letter on the cardstock in exact position. Very lightly, place a pencil mark on the top, bottom and sides of the letter to mark position.
3. Turn the letter over so that the back side is facing up. Peel the release paper from the back side to expose the acid-free, archival adhesive. Lift and place on the cardstock, using pencil lines as guides. NOTE: Double Tack is a very sticky and permanent adhesive. Position carefully — once it's down, it can't be repositioned.
4. With the top release paper still in place, burnish the Double Tack onto the cardstock with fingers. Peel away the top release paper.
5. Place Simple Leaf sheet with the shiny gold side down onto the adhesive. Burnish again with fingers until all edges of the letter are visible through the Simple Leaf release paper.
6. Lift the Simple Leaf release paper and brush away any excess with a dry paintbrush. Scraps can be saved in a container for future use.
7. Use brilliant, opaque Blick colored pencils to provide colorful ornamentation around the letter.
Options
This process can be used to apply Simple Leaf to flat or smooth surfaces such as glass, wood, plaster, metal, primed canvas or glazed pottery. To apply Simple Leaf to textured surfaces, use brush-on Adhesive in place of Double Tack adhesive. Not recommended for outdoor applications. To prevent tarnishing, spray finished pieces with Crystal Clear coating. Spray outdoors or use proper indoor ventilation, refer to cautionary labeling on product for further details.
Materials
- 140-lb Premium Cardstock, black, cut up to 24 pieces, size 4" x 4" per sheet
- Mona Lisa Simple Leaf, gold , cut up to 72 pieces, size 2-3/4" x 2-3/4" per package
- Double Tack Mounting Film , cut up to 98 pieces, size 2-1/2" x 2-1/2" per sheet
- Studio Artists’ Colored Pencils, assorted colors, distribute throughout class
- Snippy Scissors, pointed tip , one per student
- Economy Graphite Pencils, one per student
Optional: Golden Taklon, flat wash brush size 1/2", one per student
National Standards
Content Standard #1 — Understanding and applying media, techniques and processes
5-8 Students intentionally take advantage of the qualities and characteristics of art media, techniques, and processes to enhance communication of their experiences and ideas
9-12 Students apply media, techniques, and processes with sufficient skill, confidence, and sensitivity that their intentions are carried out in their artworks
Content Standard #3 — Choosing and evaluating a range of subject matter, symbols, and ideas
5-8 Students integrate visual, spatial, and temporal concepts with content to communi- cate intended meaning in their artworks
9-12 Students reflect on how artworks differ visually, spatially, temporally, and functionally, and describe how these are related to history and culture
Content Standard #4 — Understanding the visual arts in relation to history and cultures
5-8 Students analyze, describe, and demonstrate how factors of time and place (such as climate, resources, ideas, and technology) influence visual characteristics that give meaning and value to a work of art
9-12 Students differentiate among a variety of historical and cultural contexts in terms of characteristics and purposes of works of art
Content Standard #6 — Making connections between visual arts and other disciplines
5-8 Students compare the characteristics of works in two or more art forms that share similar subject matter, historical periods, or cultural context
9-12 Students compare the characteristics of works in two or more art forms that share similar subject matter, historical periods, or cultural context
