
Quilt Block Collage
Quilt Block Collage
(art + history)
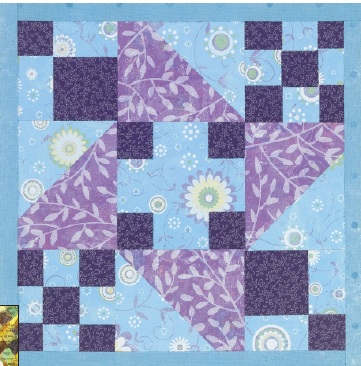
Quilt block made with decorative papers
Quilts, or the process of quilting (sewing together layers of fabric and batting), date back to Ancient Egypt and China and continue to be a modern art form. They are used to tell stories, pass down family histories, celebrate weddings and births and as pieces of art to be hung on a wall and admired. What we think of as “quilts” today — small pieces of fabric sewn together to form blocks that collectively make a whole piece — did not become popular until the mid 19th century. Making quilt blocks was a means of “recycling” pieces of fabric from clothing that was no longer usable. In this lesson plan, students will have an opportunity to study quilts through history and make their own quilt block, using paper and glue rather than fabric and stitching. It’s a great way to recycle materials and illustrate a number of design principles — rhythm, pattern, balance and unity.
Grade Levels 3-12
Note: instructions and materials based on a class of 25 students. Adjust as needed.
Preparation
1. For this project, have the students research the history of quilts. Some areas of research to consider would be: general history of quilts, uses for quilts, the history of particular quilt block patterns, women and quilting, or quilts in contemporary art. Show actual quilt examples and look at magazines featuring quilts. After some research, have them select a style of quilt or quilt block they would like to replicate with paper.
2. Cut cardstock into 12" x 12" squares.
3. If working with younger ages, pre-cut the decorative paper into small, easy-to-handle pieces.
Materials
- Construction Card, 140-lb, 18" x 24", asst. colors; share one sheet between two students
- Assorted Papers, recommend: Decorative Paper Assortment, 1-lb; share one pkg across class
- Handmade Paper; share across class
- Also, recycled book and magazine pages, photos, gift wrap, sheet music, old artwork, classroom papers, etc.
- Glue Stick, .21-oz; one per student
- Scissors; one per student
Optional Materials:
- Embellishments, such as Craft Buttons, photos, fabric, yarn, etc. Liquid Watercolor, asst. colors, 8-oz
- Bienfang® Graph Paper, 11" x 17", 50-sheet pad
Process
1. Construction of the quilt block will vary with age groups. The amount of paper needed will vary depending on the size of the base square and the complexity of the pattern. For younger children, hand out pre-cut pieces of decorative paper and glue sticks. Have them follow a simple pattern or randomly create their own. For older ages, use one of the following processes: If the pattern has simple shapes, students measure out strips of paper that are 1/2" to 4", depending on the size of the initial cardstock and number of internal blocks for the quilt square. Then have the students measure and cut those strips into squares and triangles. If the pattern is more complicated, make a preliminary drawing of the pattern onto a piece of plain paper or graph paper. Cut the pattern pieces out and trace around them onto the back of the decorative papers lightly with a pencil. Cut to make the different pieces of the quilt block.
2. Lay the cut pieces out on the cardstock first before gluing down to make sure the pattern matches the example, and that all pieces fit.
3. Glue the pieces in place.
4. Allow the student to embellish as desired.
5. The finished pieces could be matted and framed, or displayed together to form a class quilt.
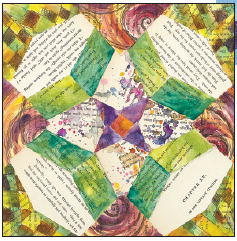
Quilt Block with cut up books pages, watercolor and marker.
Options
1. An easy way to make a quilt block with younger students is to use Roylco® Mosaic Squares. Pre-cut, perfectly square paper tiles glue easily in place and may be cut into smaller squares or triangles.
2. American folklore tells of quilt blocks that were constructed with special symbols, giving silent directions and messages to slaves escaping via the Underground Railroad. This project could be used in conjunction with studies regarding this period in history.
National Standards
Content Standard #2 Using knowledge of structures and functions
- K-4 Students use visual structures and functions of art to communicate ideas
- 5-8 Students select and use the qualities of structures and functions of art to improve communication of their ideas
- 9-12 Students demonstrate the ability to form and defend judgments about the characteristics and structures to accomplish commercial, personal, communal, or other purposes of art
Content Standard #4 Understanding the visual arts in relation to history and cultures
- K-4 Students demonstrate how history, culture, and the visual arts can influence each other in making and studying works of art
- 5-8 Students know and compare the characteristics of artworks in various eras and cultures
- 9-12 Students describe the function and explore the meaning of specific art objects within varied cultures, times, and places
Content Standard #6 Making connections between visual arts and other disciplines
- K-4 Students identify connections between the visual arts and other disciplines in the curriculum
- 5-8 Students describe ways in which the principles and subject matter of other disciplines taught in the school are interrelated with the visual arts
- 9-12 Students compare characteristics of visual arts within a particular historical period or style with ideas, issues, or themes in the humanities or sciences