Database Security
Unit Objective:
The main objective of this unit is reader can learn how to create and alter database user, default tablespace, temporary tablespace and quota.
1.1 User Authentication
Authentication means verifying the identity of user or entity or any resource. Authentication is responsible to identify which user is interest to use any information or data from the database or applications. Especially the Oracle Database Administrator obtains special authentication operation such as creating, altering and removing database user. And also assign system tablespace and temporary tablespace.
Data security classifies into various stages i.e Authentication, Authorization, Access control and Auditing. Initial step is to identify the user. The next step is after identifying the user check their privileges i.e. authorization and access rights or access control. All the above stages are useful for monitoring user action in auditing process. There is various authentication ways to identify users are Basic Authentication, Strong Authentication, Enterprise User security and proxy authentication.
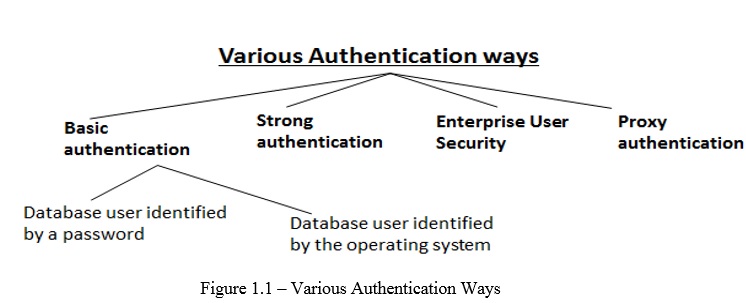
Figure 1-1 Various Authentication ways
1.2 Basic authentication- Database user identified by a password
The syntax of the Create User statement is given below. We will study each part of the syntax in details. We will study first two lines "Create user <username> identified by <password>"
CREATE USER <username>
IDENTIFIED BY <password>
DEFAULT TABLESPACE <permanent Tablespace name/user created tablespace>
QUOTA <size> ON <default tablespace name>
TEMPORARY TABLESPACE <tablespace name>
PROFILE <profile name>
CREATE USER is a system privilege, the database administrator or security administrator generally has this privilege to create database user identified by password. Create session using user as “SYS” and SYS user has privilege as system database administrator. The user name is : sys and password also sys

fig1-2_1BQwKi7.jpgFigure 1-2 Create User
Figure 1-2 Create User
An IDENTIFIED BY PASSWORD user
is always authenticated by the database. In the above statement Arvind is a
user name and password is Arvind123. The password is case sensitive. This
user has a schema. The schema may be empty but it does exist. A newly created
user cannot connect to the
database until you grant the user the CREATE SESSION system
privileges.

Figure 1-3 Create Session to User
All
user names are stored as Upper-case in the database. Now check the user Arvind is
stored in the database in upper-case letters.
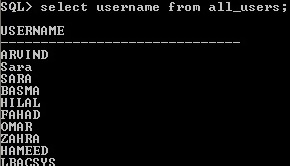
fig1-4_6BLuUTC.jpgFigure 1-4 User name stored as Capital Letters
Figure 1-4 User name stored as Capital Letters
Within each database, a user name must be unique with respect to other user names

Figure 1-5 User Name must be Unique
If user name is enclosed with double quotation marks, then the user name will be stored as given user name case instead of storing as upper-case letters. For example, suppose “Arvind” user name in double quotation, then it will store first letter “A” is upper-case and remaining all the letter in the given case only. Now it will accept even though same name Arvind one user is "ARVIND" and another user is "Arvind".
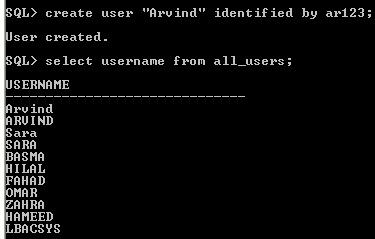
Figure 1-6 Same User name with case Sensitive
There is another method to create new user using GRANT Statement, no need for create user statement and then granting create session. In the single statement, we can create and grant the session to the user

Figure 1-7 Create User Using Grant Create Session
1.2.1. changing user password
ALTER USER sinduja identified by sindu123456;
Using alter user statement after identified by give new password, then it will change the new password of the user. Previous password of user sinduja is sinduja0708, now new password is sindu123456;
1.3 Listing All Users Information
The database dictionary view DBA_USERS describes all users of the database and their related information like password of the user, account status of the user and assigned profile name to the user etc.,
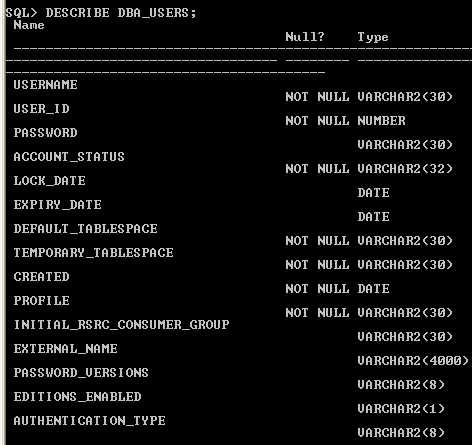
Figure 1-8 Describe DBA_USERS
Display
the Arvind user information using DBA_USERS data dictionary view. As
early stated always username should be in ' ' single quotes using capital
letters not lower letters. If you use lower case in between ' ' not only
username suppose using profile name in the where condition that time also
always specific CAPITAL LETTERS. Otherwise you will get "no row selected" output.

Figure 1-9 use Capital in Data Dictionary where condition
Using
ALTER USER statement, we can change the password of the user.
ALTER USER ARVIND IDENTIFIED BY ARVIND010203;
Now, new password of the user ARVIND is ARVIND010203. After "identified by" whatever password specify that is new password of the user.
1.4 Assigning a Default Tablespace for the User
Each user should have a default tablespace. When a schema object (like table, index, view..) is created in the user’s schema and the Data Definition Language(DDL) i.e create statement does not specify a tablespace to contain the object, Oracle Database stores the object in the default user’s tablespace. Default tablespaces of all users is the SYSTEM tablespace. In general, do not store user data in the SYSTEM tablespace, then user should specifically assign the user a default tablespace, such as the USERS tablespace. we don't assign any specific tablespace to user Arvind, i.e it automatically assign default permanent tablespace "USERS" is assigned to user Arvind.

fig1-10_r5m8229.jpgFigure 1-10 Display the Default permanent tablespace to the user
Figure 1-10 Display the Default permanent tablespace to the user
Use the CREATE TABLESPACE statement to create a default permanent tablespace other than SYSTEM at the time of database creation. For example create “Arvind_ts” as default tablespace and then assign to user Arvind. Here we already created user Arvind. So, using ALTER USER statement reassign the Arvind_ts instead of USERS default tablespace.
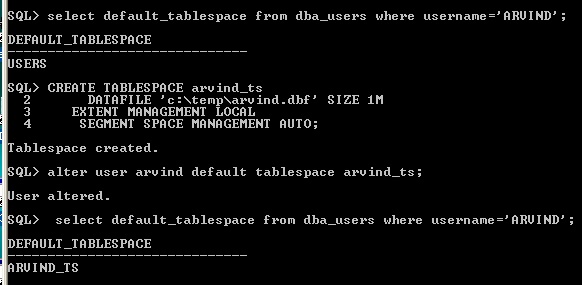
Figure 1-11 Alter User Default Table Space
There
is two ways we can change the default tablespace one is as early we
explained using alter user statement, in this statement only specific user
tablespace to be used but remaining all other user tablespace remain the same.
For example, check the another user sinduja default tablespace it is USERS tablespace
not Arvind_ts tablespace.
Because we used ALTER USER statements so it will change only Arvind user
default permanent tablespace as "Arvind_ts" not
another user sinduja.
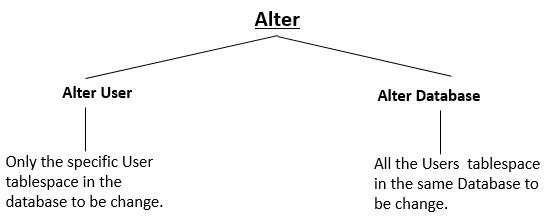
Figure 1-12 Alter User vs. Alter Database

Figure 1-13 Display another user tablespace
Using ALTER DATABASE statement
if default tablespace is changed, then it will assign modified tablespace to
all user using the same database. Previously the user sinduja has USERS
tablespace, if you change default tablespace as “Arvind_ts” then it
automatically changing sindhuja tablespace as “Arvind_ts”

Figure 1-14 Alter Database default permanent tablespace
The
ALTER database default tablespace statement not affect the system user like
SYS, SYSTEM, and OUTLN. By default they have permanent default tablespace
is SYSTEM.

Figure 1-15 System User Tablespace
If
any tablespace is assigned as default permanent to all user using ALTER
DATABASE or any specific user using ALTER USER. That tablespace is not possible
to drop. So before dropping the assigned default permanent tablespace to modify
by some other tablespace or USERS tablespace, then it is possible to drop
assigned default permanent tablespace.
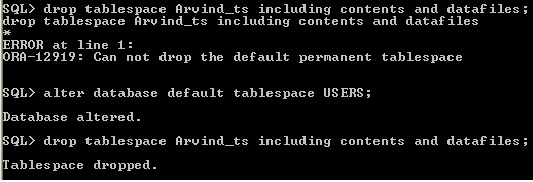
Figure 1-16 Drop Default Table space
1.5 Assigning a Temporary Tablespace for the User
Using CREATE USER statement to assign each user a temporary tablespace. For executing any SQL statement temporary segment is needed. The temporary segment are stored in temporary tablespace of the user. The purpose of temporary tablespace are used operations like merging or sorting data result and using hash joins in SQL. Every database creation by default only one temporary table space will be created. While creating user if temporary tablespace is not mentioned then by default Oracle database will assign SYSTEM temporary tablespace “TEMP” to user.
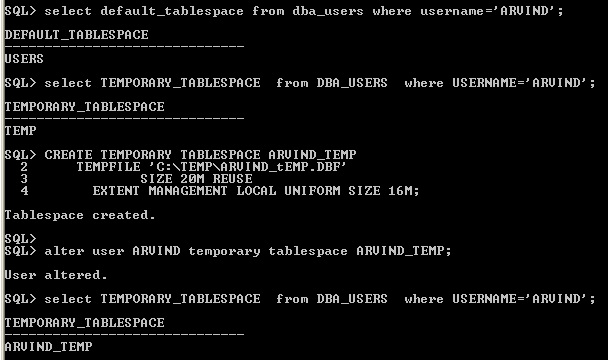
fig1-17_TocWZkp.jpgFigure 1-17 User Defined Temporary Tablespace
Figure 1-17 User Defined Temporary Tablespace
Using ALTER DATABASE Statement
like default permanent tablespace the temporary tablespace can also be assign
to all the user in the database.

Figure 1-18 User Defined Temporary Tablespace
In
the same manner, once temporary tablespace is assign to any user then dropping
the specific default temporary tablespace gives error.

fig1-19_odBFsmg.jpgFigure 1-19 Drop Tablespace
Figure 1-19 Drop Tablespace
1.6 Assigning a Tablespace Quota for the User
The tablespace quota allocate storage space for each user creating their own schema objects like table, dimension, index, view and materialized view etc., Even though the user has privilege to create and insert table privilege, while inserting values into table object the “ORA-01950: no privileges on tablespace USERS” error will occur. This error the user has default permanent tablespace is USERS.
Use the DBA_TS_QUOTAS data dictionary view has all tablespace quotas associated information specifically assigned to each user.
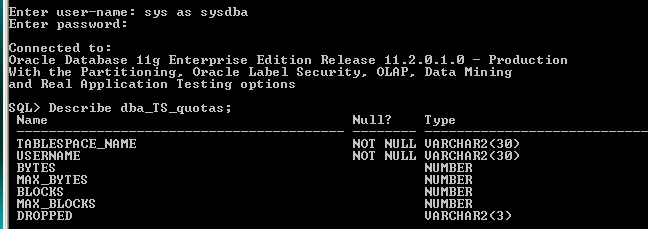
Figure 1-20 Describe Tablespace Quota
Figure 1-20 Describe Tablespace Quota
By
default there is no quota allocated to user. In Figure 1-21, the username
"Arvind" and "Sinduja" is missing. Because we don't
allocate any quota for the user. Like default permanent tablespace or temporary
tablespace it don't assign automatically. Quota should be specifically
assign to user.

Figure 1-21 Tabalespace Quota
The
same user has more than one quota from more than one tablespace.
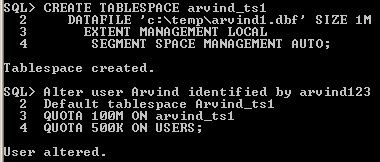
Figure 1-22 Same user has more than one Quota
Quota cannot to allocate to temporary tablespace, it is only for permanent default tablespace.

Figure 1-23 Quota Don't Assign Temporary Tablespace
For
revoking Quota, assign zero value in the Quota.

Figure 1-24 Revoke Quota
Assign “UNLIMITED” quota value to user.

Figure 1-25 Unlimited Quota Value
1.7 Remove User Accounts
For removing user account from the database use DROP USER STATEMENT

Figure 1-26 Drop User
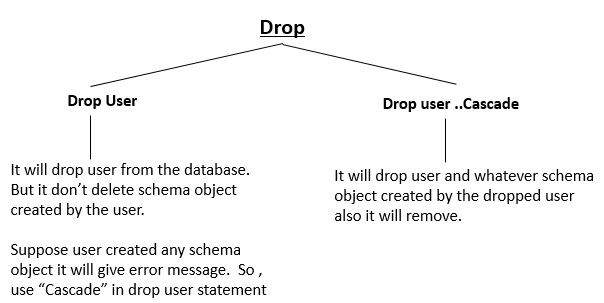
Figure 1-27 Drop User ...Cascade
1.8 External Authentication
The OS_AUTHENT_PREFIX initialization parameter determines the relationship between the OS account name and the database account name. OS_AUTHENT_PREFIX parameter values are set in init.ora (initialization parameter file) or spfile (server parameter file). Default value of OS_AUTHENT_PREFIX is OPS$.
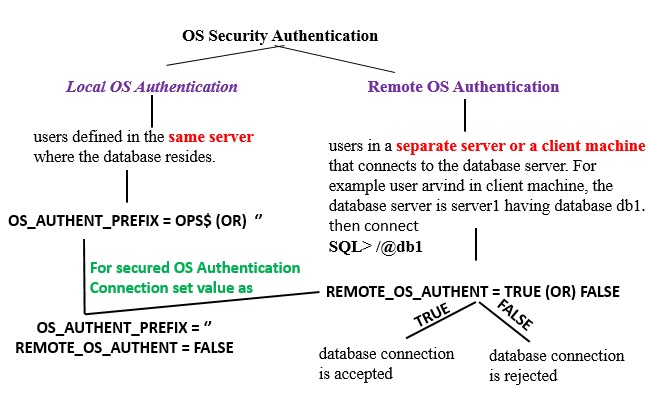
os authentication
For more security aspect of External Authentication follow
- Don't create database user name starting with ops$.
- remote_os_authent =FALSE, always remote users connect to the database without the password makes more secure.
For Local OS Authentication check the OS_AUTHENT_PREFIX value
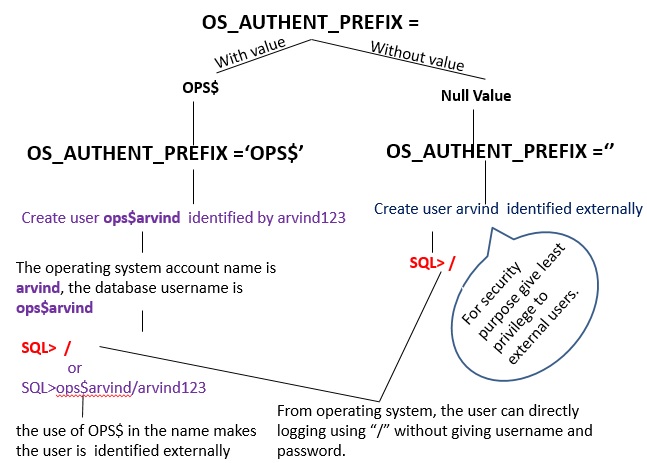
os_authent_prefix
Enter user-name: sys as sysdba
Enter password: sys
Connected to:
Oracle Database 11g Enterprise Edition Release 11.2.0.1.0 - Production
With the Partitioning, Oracle Label Security, OLAP, Data Mining
and Real Application Testing options
SQL> show parameter OS_AUTHENT_PREFIX
NAME TYPE VALUE
------------------------------------ ----------- ------------------------------
os_authent_prefix string OPS$
SQL> alter system set OS_AUTHENT_PREFIX='' scope=spfile;
System altered.
SQL> show parameter OS_AUTHENT_PREFIX
NAME TYPE VALUE
------------------------------------ ----------- ------------------------------
os_authent_prefix string OPS$
After alter system it don't change the value of OS_AUTHENT_PREFIX value, therefore shutdown and restart the database then only the value is altered.
SQL> shutdown immediate
Database closed.
Database dismounted.
ORACLE instance shut down.
SQL> startup
ORACLE instance started.
Total System Global Area 535662592 bytes
Fixed Size 1375792 bytes
Variable Size 314573264 bytes
Database Buffers 213909504 bytes
Redo Buffers 5804032 bytes
Database mounted.
Database opened.
SQL> show parameter OS_AUTHENT_PREFIX
NAME TYPE VALUE
------------------------------------ ----------- ------------------------------
os_authent_prefix string
Now OS_AUTHENT_PREFIX value is NULL.
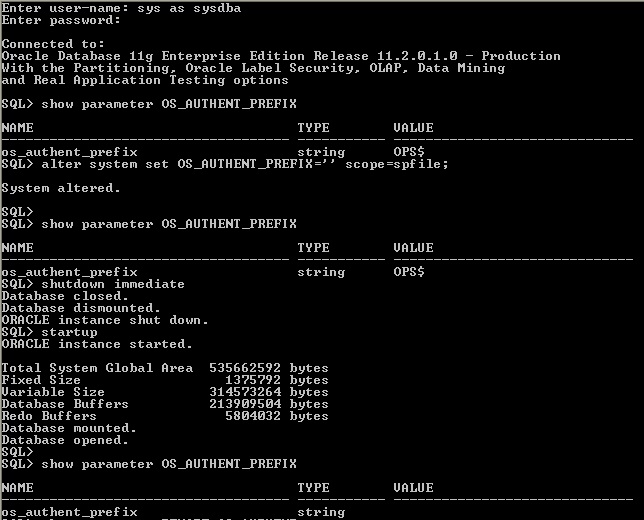
os_authent_prefix null
For checking remote authentication

remote authentication

change value as true for remote os authent
create user ops$arvind identified by arvind123
GRANT CONNECT TO ops$arvind
The V$session_connect_info will displays information about network connections for all currently using sessions.
SELECT sid, authentication_type, osuser FROM v$session_connect_info;
1.9 Proxy Authentication
create proxy users, allowing to access a schema via a different username/password combination. The GRANT CONNECT THROUGH allow the proxy user to connect the database without knowing the database user password. Create user sinduja and proxy user as proxy_sindu.
Enter user-name: sys as sysdba
Enter password: sys
SQL> create user sinduja identified by sindu123;
SQL> create user proxy_sindu identified by proxy123;
SQL> alter user sinduja grant connect through proxy_sindu;
SQL> grant create session to sinduja;
SQL> grant create session to proxy_sindu;
SQL> conn proxy_sindu[sinduja]
Enter password:proxy123
Connected.
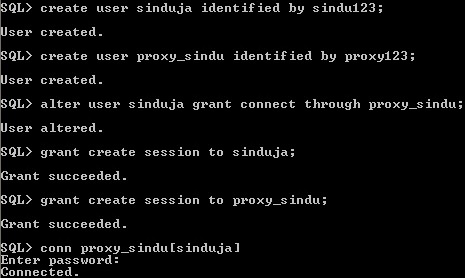
Proxy User
Check the currently connecting user, it show sinduja

show user
Display the proxy-user information,

proxy-user
1.9.1. Assign role to proxy user
In the FLAGS column it shows that "Proxy may activate all client roles", we can assign role while granting to proxy user. create two roles sindurole and manager and grant this two role to sinduja.

sindurole

assign role to proxy user
Using "with role" clause, it is possible to assign specific role to proxy user.
Restriction of assigning role to proxy user also possible with role..except clause, in this case proxy_user flags information is "PROXY MAY NOT ACTIVATE ROLE"

except role
1.9.2. Remove the connection of proxy user
Using Revoke connect through remove the proxy user connection to middle tier server.
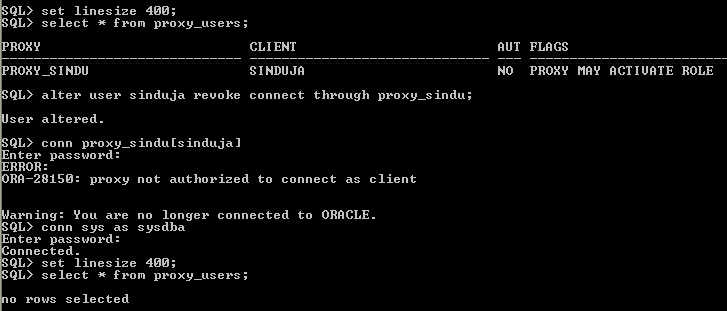
revoke proxy user
1.9.3 Proxy user authenticated using password

proxy authenticate using password
using the above statement the middle-tier server proxy_sindu is authorized to connect as user sinduja. The proxy user proxy_sindu is mandatory to pass the user password of sinduja to the database server for authorization.
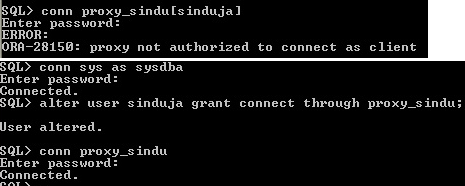
Authorized to connect client
Remove the authenticated using password clause form proxy user, then it is possible to connect with middle tier server.
Unit Summary
After completing this unit the reader get knowledge about how to create user for authentication. It describes default tablespace, temporary tablespace and quota assign for user explained using oracle 11g. Only profile part is remaining in the user associated information. The profile will be explained in the Unit 2.
Practical Exercise 1-Database User
1. Create default permanent tablespace as “Lak_ts” using “lak.dbf” file. While creating user Lakshmi do the following:
- Lakshmi password is Lak01020
- Assign Lak_ts tablespace to user Lakshmi
- Assign unlimited quota using Lak_ts tablespace.
2. Revoke the quota value of the user Lakshmi.
3. Change the password of the user Lakshmi to Lakshmi1546
4. Display default permanent tablespace of the user Lakshmi
5. Display temporary tablespace of the user Lakshmi.
6. Change the default permanent table space as "USERS" to user LAKSHMI
7. Login Lakshmi session
8. Remove the user Lakshmi from the database.
9. create user lakshmi as OS authenticated user and display the OS_AUTHENCATE_PREFIX value.
Exercise 2 - Proxy user
1.The user lakshmi has security_officer role.
2.Assign proxy user proxy_lakshmi to user lakshmi
3.Display the proxy_user, client and flag information.
4.Login the proxy_Lakshmi.
5.Assign password authentication to proxy_Lakshmi.
6.Remove the proxy_Lakshmi connection from the user Lakshmi.
(For Exercise Solution click "EXERCISE SOLUTION")
Question
1. Differentiate Drop user and Drop user..Cascade
2. Explain Default Tablespace and Temporary Tablespace while creating or altering user
3. Discuss the purpose of Quota
4. Compare Alter User and Alter Database for assigning Table space to user.
Video Tutorial Link
Almost all the topics of the Unit 1 is covering in my you video tutorial, as per video this topic is chapter 3. Different example data set I used in my video, it is just supporting video gives more clarity to reader to understand the Unit 1 topic.
"Create USER" youtube video tutorial link
Lecture Notes
This unit lecture presentation is available in the given below slideshare link
Power point Presentation of the unit
References
[1] Patricia Huey (2014) Oracle Database, Security Guide 11g Release 2 (11.2).
[2] https://docs.oracle.com/cd/B19306_01/network.102/b14266/admnauth.htm#i1006269
[3] https://technokeen.wordpress.com/2012/03/02/what-is-os_authent_prefix-and-ops-in-oracle/
[4] http://www.dba-oracle.com/security/local_os_authentication.htm
[5] http://stepintooracledba.blogspot.com/2013/01/ora-02095-specified-initialization.html
[6] https://oracle-base.com/articles/misc/proxy-users-and-connect-through
[7] http://www.dba-oracle.com/t_grant_connect_through.htm
[8] https://docs.oracle.com/cd/E11882_01/network.112/e36292/authentication.htm#DBSEG99862