- Subject:
- Geometry
- Material Type:
- Lesson Plan
- Level:
- Middle School
- Grade:
- 7
- Provider:
- Pearson
- Tags:
- License:
- Creative Commons Attribution Non-Commercial
- Language:
- English
- Media Formats:
- Text/HTML
Education Standards
Project Rubric: Zooming in On Figures
Applying Scale to Project
Overview
Students will resume their project and decide on dimensions for their buildings. They will use scale to calculate the dimensions and areas of their model buildings when full size. Students will also complete a Self Check in preparation for the Putting It Together lesson.
Key Concepts
The first part of the project is essentially a review of the unit so far. Students will find the area of a composite figure—either a polygon that can be broken down into known areas, or a regular polygon. Students will also draw the figure using scale and find actual lengths and areas.
Goals
- Redraw a scale drawing at a different scale.
- Find measurements using a scale drawing.
- Find the area of a composite figure.
SWD: Consider what supplementary materials may benefit and support students with disabilities as they work on this project:
Vocabulary resource(s) that students can reference as they work:
- List of formulas, with visual supports if appropriate
- Class summaries or lesson artifacts that help students to recall and apply newly introduced skills
- Checklists of expectations and steps required to promote self-monitoring and engagement
- Models and examples
Students with disabilities may take longer to develop a solid understanding of newly introduced skills and concepts. They may continue to require direct instruction and guided practice with the skills and concepts relating to finding area and creating and interpreting scale drawings. Check in with students to assess their understanding of newly introduced concepts and plan review and reinforcement of skills as needed.
ELL: As academic vocabulary is reviewed, be sure to repeat it and allow students to repeat after you as needed. Consider writing the words as they are being reviewed. Allow enough time for ELLs to check their dictionaries if they wish.
Project Rubric
Lesson Guide
Have students view the project rubric. Give students 2 minutes to study the rubric. Then have students take turns saying one thing about the rubric without looking at it. When students are finished, tell them that today they will add any specifics to the rubric that they think are needed for evaluating their projects.
Have extra cardboard squares and base sheets ready for those students who did not finish creating their base in Lesson 3.
ELL: In this type of activity, make sure ELLs participate and don't shy away from speaking.
Opening
Project Rubric
Work with a partner to review the project rubric.
- Take a few minutes to study the rubric by yourself.
- Without looking at the rubric, take 1 minute to describe the rubric as completely as possible to your partner (who can look at the rubric). Your partner should listen carefully to your description.
- Briefly look at the rubric again. Your partner should now take 30 seconds to add to your description of the rubric, without repeating any of your description and without looking at the rubric.
HANDOUT: Project Rubric: Zooming in on Figures
Math Mission
Lesson Guide
Discuss the Math Mission. Students will work on the next steps of their project and evaluate their progress using the project rubric.
Opening
Work on your project and evaluate your progress using the project rubric.
Project Work
Lesson Guide
Students will spend the majority of the time working on the project. If students complete the first part of the project and have time to work on the net of the prisms, they can begin planning using the centimeter grid on their screens.
Allow time at the end of the period for the Self Check.
Preparing for Ways of Thinking
Look for the following strategies to discuss with the whole class:
- Students who use different methods to find the area of the polygons
- Students who use the grid to locate the polygons, and those who don’t
- Students who realize that some of the side lengths might not be on the grid, but can still start and end at the grid intersection—these sides will need to be measured with a ruler (these students may also realize that using a regular polygon as the base will be tricky because most of the sides will not be on the grid and a protractor will be needed to measure interior angles)
SWD: Some students with disabilities may struggle to complete all the tasks in the time allotted.
Consider:
- Reducing the number of tasks that some students need to complete during this lesson; this may entail reducing the number of tasks students need to complete to demonstrate understanding of necessary skills.
- Partnering students with disabilities with typically developing peers as support and/or assigning partners different jobs to reduce the number of tasks each individual is expected to complete.
- Highlight specific areas/skills in the rubric on which students should focus.
Mathematical Practices
Mathematical Practice 3: Construct viable arguments and critique the reasoning of others.
- Look for students who understand how to find the actual lengths and areas, and can explain the process clearly.
- As students work, look for students who can justify their thinking.
Mathematical Practice 5: Use appropriate tools strategically.
- Some students will realize that the accuracy of their drawing will be enhanced by using the grid, while at the same time also realizing that a regular polygon base will be a little tricky.
Mathematical Practice 6: Attend to precision.
- Look for students who use the correct units.
Work Time
Project Work
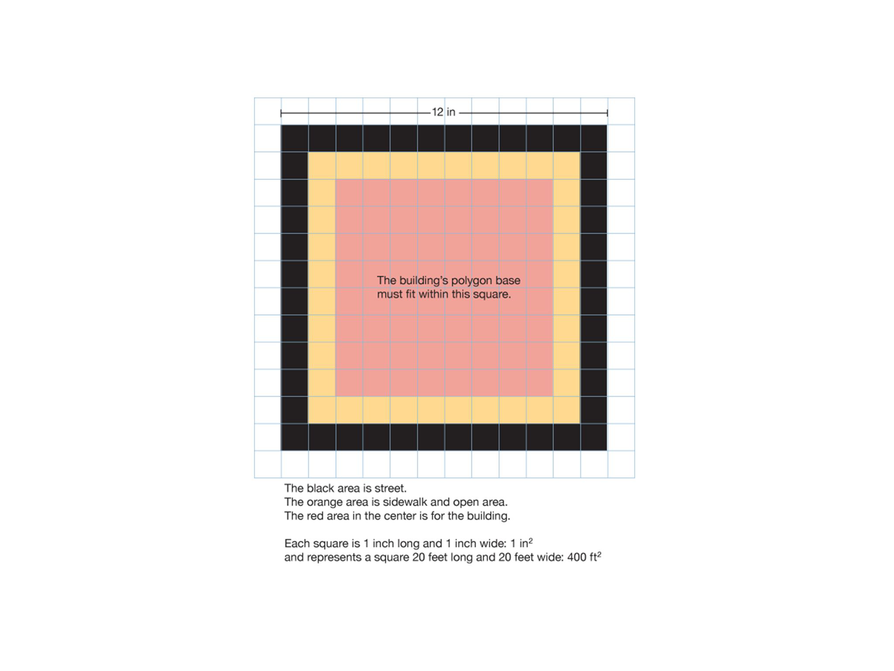
Today you will use scale to determine measures of your buildings. You will use the scale 20:1—that is, 20 ft to 1 in.
Follow these steps for each of your model buildings. Keep the rubric in mind as you work on your project.
- Decide on a height for the full-size building. (It should not be taller than 200 ft.)
- Use the scale to calculate the height of your model building based on the height of the full-size building.
- Measure the dimensions of the polygon base you made in the first project lesson.
- Using the scale, calculate the dimensions of the base of the full-size building.
- Determine the area of the base of the full-size building.
- Draw a sketch to show what your model building will look like.
Hint:
- As you work, use the project rubric to evaluate your progress and make sure you are on the right track.
Make Connections
Mathematics
Discuss the work students completed today. Ask questions such as these:
- How did you decide what the polygon should look like?
- How did you find the area of the polygon?
- How did you find the actual lengths and areas?
- What strategies did you use to find the area of the polygons?
- How did [student names] organize their thoughts differently? Which way of thinking makes more sense to you? Which way of thinking brought out the structure of the mathematics?
- How did [student names] make sense of the problem?
- Could you state what [student names] said in a different way?
- How could you measure more accurately?
ELL: Consider projecting these questions so that all students (especially ELLs) can view them as they are asked to respond.
Performance Task
Make Connections
Look at the rubric again.
- Notice the blank column with the heading “Specific to This Project.” Is there anything that you think should be added to this column?
- Next, look at the bottom row that is blank. Is there any scoring criterion for the project that you think should be added here?
- Take a few minutes to discuss these questions with your partner. Write down any ideas you have.
- Discuss your ideas as a class. As you propose an idea, make sure to explain why you think it is important. After all ideas are discussed, the class will decide as a group whether to adopt any of the suggestions.
HANDOUT: Project Rubric: Making Connections
Self Check
Lesson Guide
This task allows you to assess students’ work and determine what difficulties they are having. The results of the Self Check will help you determine which students should work on the Gallery and which students would benefit from review before the assessment. Have students work on the Self Check individually.
SWD: Students with disabilities may have difficulty with operations involving more complex numbers (decimals). Possible supports to allow students to practice conceptual skills related to scale drawings more independently may include:
- Allowing students access to a calculator
- Rounding or adjusting values to allow students to work with “friendlier” numbers
- Providing partially scaffolded answers
ELL: As students work on the Self Check problems, allow ELLs to use dictionaries (monolingual and bilingual).
Assessment
Have students submit their work to you. Make notes on what their work reveals about their current levels of understanding and their different problem-solving approaches.
Do not score students’ work. Share with each student the most appropriate Interventions to guide their thought process. Also note students with a particular issue so that you can work with them in the Putting It Together lesson that follows.
Interventions
Student does not calculate the areas correctly.
- How do you find the area of a triangle?
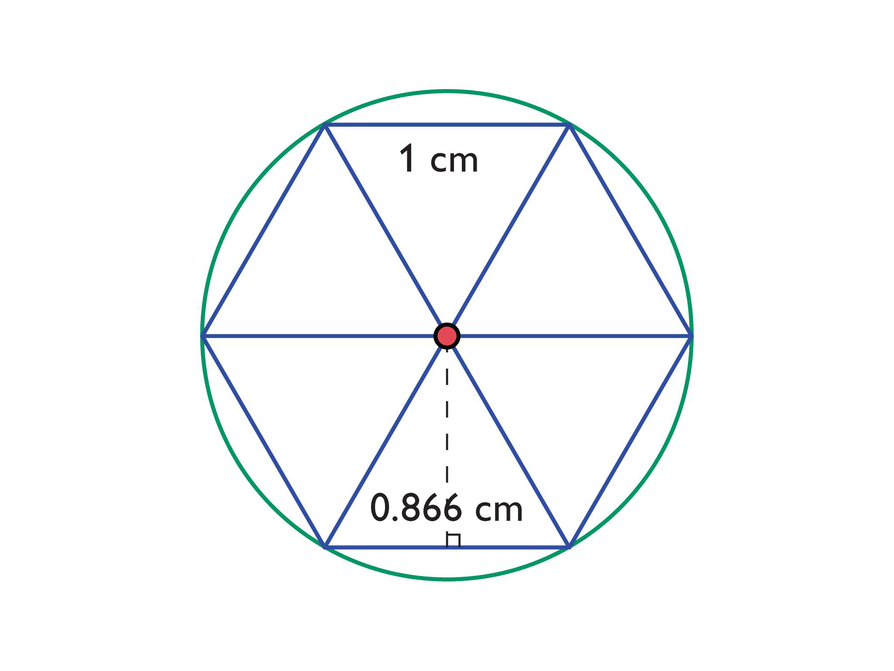
- What is the base length and height of each triangle?
- What types of triangles is the hexagon divided into?
- What is the radius of the circle?
Student does not calculate the perimeters correctly.
- How long is each side of the hexagon?
- What type of triangles is the hexagon divided into?
- What is the diameter of the circle?
Student does not understand what the lengths will be in the redrawn figure.
- If 1 centimeter becomes 2 feet, what factor did the length increase by (ignoring the units)?
- What factor should the apothem increase by?
Student provides a poor explanation, such as explaining calculations rather than giving mathematical reasons.
- What is the length of the apothem and hexagon side?
- What are these lengths when the figure is redrawn?
Student provides adequate solutions to all questions
- Find a different way of solving the problem.
Answers
The hexagon has area 2.6 cm:
= 0.866()
= 0.866 ⋅ 3
= 2.598
The circle has area 3.14 cm:
= (3.14)(1 ⋅ 1)
= 3.14
The circle area is larger than the hexagon area. The difference is: 3.14 cm− 2.6 cm = 0.54 cm.
The perimeter of the hexagon is 6 cm because each side is 1 cm. The circumference of the circle is 6.28 cm:
C = πd C = 3.14(2) C = 6.28
The circumference is longer than the perimeter of the regular hexagon by 0.28 cm (6.28 cm − 6 cm = 0.28 cm).The dimensions will be doubled (with different units) because 2 ft are replacing 1 cm. The side lengths and radius will be 2 ft, and the apothem will be 0.866 in. ⋅ 2 ft/in 1.732 ft. The hexagon will have area 10.39 ft:
= 1.732 ⋅ 6 = 10.392
The circle will have area 12.56 ft:
= (3.14)(2 ⋅ 2) = 12.56
Formative Assessment
Self Check
Complete this Self Check by yourself.
- What is the area of the regular hexagon? What is the area of the circle? Compare the two areas.
- What is the perimeter of the regular hexagon? What is the circumference of the circle? Compare the two lengths.
- If the figure were redrawn at a scale of 1 cm : 2 ft, what would the area of the regular hexagon in the drawing be? What would the area of the circle be?
Reflect On Your Work
Lesson Guide
Have each student write a brief reflection before the end of class. Review the reflections to see students’ work on the next steps of their project and how they evaluated themselves using the project rubric. If you notice insightful comments, plan to share them with the class in the next lesson.
Work Time
Reflection
Write a reflection about the ideas discussed in class today. Use the sentence starters below if you find them to be helpful.
Today my partner and I accomplished …
Our next steps are …