- Author:
- Adam Schaeffer
- Subject:
- Computer Science, Information Science, Electronic Technology, Educational Technology
- Material Type:
- Diagram/Illustration, Reading, Student Guide
- Level:
- Lower Primary, Upper Primary, Middle School, High School, Community College / Lower Division, College / Upper Division, Graduate / Professional, Career / Technical, Adult Education
- Grade:
- K
- Tags:
- License:
- Creative Commons Attribution Share Alike
- Language:
- English
- Media Formats:
- Graphics/Photos, Text/HTML
Colourful Creations | Raspberry Pi Projects
Getting started with Raspberry Pi | Raspberry Pi Projects
Lost in space | Raspberry Pi Projects
Rock, Paper, Scissors | Raspberry Pi Projects
Secret Messages | Raspberry Pi Projects
Setting up your Raspberry Pi | Raspberry Pi Projects
Using your Raspberry Pi | Raspberry Pi Projects
Raspberry Pi Resources, Setup to First Program
Overview
Table of Contents:
Section 1: Setting Up Your Raspberry Pi
Section 2: Using Your Raspberry Pi
Section 3: Getting Started With Your Raspberry Pi
Section 4: Activities for Beginners
This is an edited (for structure) and compiled OER of the first three tutorials and some selected activities from Raspberrypi.org. All materials from the RaspberryPi Foundation are licensend under a Creative Commons Attribution-ShareAlike 4.0 International license.
Setting up your Raspberry Pi
Setting up your Raspberry Pi 
How to set up and start your Raspberry Pi for the first time
Step 1 Introduction
Here you’ll learn about your Raspberry Pi, what things you need to use it, and how to set it up.
We also have a three-week online course available on the FutureLearn platform (http://rpf.io/rpi-fl), and a Raspberry Pi forum (https://www.raspberrypi.org/forums), including the Beginners (https://www.raspberrypi.org/forums/viewforum.php?f=91) section, if you want to ask questions and get support from the Raspberry Pi community.
If you need to print this project, please use the printer-friendly version (https://projects.raspberrypi.org/en/projects/raspberry-pi-setting-up/print).
Step 2 What you will need
Which Raspberry Pi?
There are several models of Raspberry Pi (https://www.raspberrypi.org/products/), and for most people Raspberry Pi 4 Model B is the one to choose. Raspberry Pi 4 Model B is the newest, fastest, and easiest to use.
Raspberry Pi 4 comes with 2GB, 4GB, or 8GB of RAM. For most educational purposes and hobbyist projects, and for use as a desktop computer, 2GB is enough.
Raspberry Pi Zero, Raspberry Pi Zero W, and Raspberry Pi Zero WH are smaller and require less power, so they’re useful for portable projects such as robots. It’s generally easier to start a project with Raspberry Pi 4, and to move to Raspberry Pi Zero when you have a working prototype that a smaller Raspberry Pi would be useful for.
If you want to buy a Raspberry Pi, head to rpf.io/products (https://rpf.io/products).
A power supply
To connect to a power socket, all Raspberry Pi models have a USB port (the same found on many mobile phones): either USB-C for Raspberry Pi 4, or micro USB for Raspberry Pi 3, 2, and 1.

You need a power supply that provides:
At least 3.0 amps for Raspberry Pi 4

At least 2.5 amps for Raspberry Pi 3

We recommend using our o!cial USB-C Power Supply (https://www.raspberrypi.org/products/type-c-power-supply/) for Raspberry Pi 4, or our o!cial Universal Power Supply (https://www.raspberrypi.org/products/raspberry-pi-universal-power-supply/) for Raspberry Pi 3, 2, or 1.
A microSD card
Your Raspberry Pi needs an SD card to store all its files and the Raspberry Pi OS operating system.

You need a microSD card with a capacity of at least 8GB.
Many sellers supply SD cards for Raspberry Pi that are already set up with Raspberry Pi OS and ready to go.
A keyboard and a mouse
To start using your Raspberry Pi, you need a USB keyboard and a USB mouse.
Once you’ve set up your Raspberry Pi, you can use a Bluetooth keyboard and mouse, but you’ll need a USB keyboard and mouse for the first setup. A TV or computer screen
To view the Raspberry Pi OS desktop environment, you need a screen, and a cable to link the screen and your Raspberry Pi. The screen can be a TV or a computer monitor. If the screen has built-in speakers, Raspberry Pi is able to use these to play sound.
HDMI
Your Raspberry Pi has an HDMI output port that is compatible with the HDMI port of most modern TVs and computer monitors. Many computer monitors may also have DVI or VGA ports. Raspberry Pi 4 has two micro HDMI ports, allowing you to connect two separate monitors.

You need either a micro HDMI to HDMI cable, or a standard HDMI to HDMI cable plus a micro HDMI to HDMI adapter, to connect Raspberry Pi 4 to a screen.
Raspberry Pi 1, 2, and 3 have a single full-size HDMI port, so you can connect them to a screen using a standard HDMI to HDMI cable.

DVI
If your screen has a DVI port, you can connect your Raspberry Pi to it using an HDMI to DVI cable.

VGA
Some screens only have a VGA port.

To connect your Raspberry Pi to such a screen, you can use an HDMI to VGA adapter.

Optional extras
A case
You may want to put your Raspberry Pi in a case. This is not essential, but it will provide protection for your Raspberry Pi. If you’d like, you can use the o!cial case for Raspberry Pi 4 (ht tps://www.raspberrypi.org/products/raspberry-pi-4-case/) or Raspberry Pi Zero or Raspberry Pi Zero W (https://www.raspberrypi.org/products/raspberry-pi-zero-case/).
Headphones or speakers
The large Raspberry Pi models (but not Raspberry Pi Zero or Raspberry Pi Zero W) have a standard audio port like the one on a smartphone or MP3 player. If you want to, you can connect your headphones or speakers so that your Raspberry Pi can play sound. If the screen you’re connecting your Raspberry Pi to has built-in speakers, Raspberry Pi can play sound through these.
An Ethernet cable
The large Raspberry Pi models (but not Raspberry Pi Zero or Raspberry Pi Zero W) have a standard Ethernet port to connect them to the internet; to connect Raspberry Pi Zero to the internet, you need a USB to Ethernet adapter.
Raspberry Pi 4, Raspberry Pi 3, and Raspberry Pi Zero W can also be wirelessly connected to the internet.
Step 3 Set up your SD card
If you have an SD card that doesn’t have the Raspberry Pi OS operating system on it yet, or if you want to reset your Raspberry Pi, you can easily install Raspberry Pi OS yourself. To do so, you need a computer that has an SD card port — most laptop and desktop computers have one.
The Raspberry Pi OS operating system via the Raspberry Pi Imager
Using the Raspberry Pi Imager is the easiest way to install Raspberry Pi OS on your SD card.
Note: More advanced users looking to install a particular operating system should use this guide to installing operating system images (https://www.raspberrypi.org/documentati on/installation/installing-images/README.md).
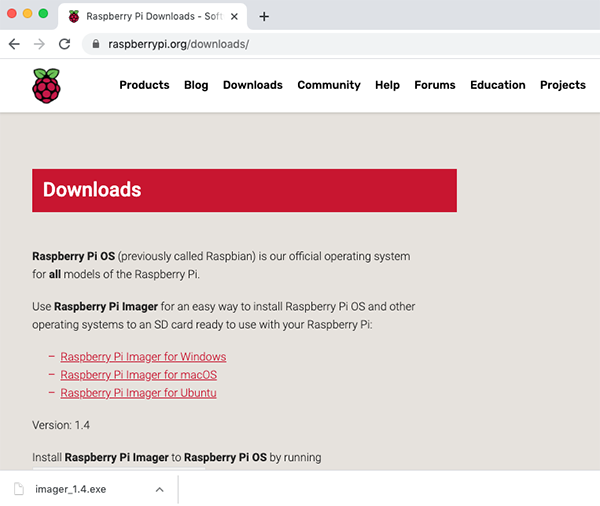
Download and launch the Raspberry Pi Imager
Visit the Raspberry Pi downloads page (https://www.raspberrypi.org/downloads)

Click on the link for the Raspberry Pi Imager that matches your operating system

When the download finishes, click it to launch the installer
Using the Raspberry Pi Imager
Anything that’s stored on the SD card will be overwritten during formatting. If your SD card currently has any files on it, e.g. from an older version of Raspberry Pi OS, you may wish to back up these files first to prevent you from permanently losing them.
When you launch the installer, your operating system may try to block you from running it. For example, on Windows I receive the following message:

If this pops up, click on More info and then Run anyway
Follow the instructions to install and run the Raspberry Pi Imager
Insert your SD card into the computer or laptop SD card slot
In the Raspberry Pi Imager, select the OS that you want to install and the SD card you would like to install it on
Note: You will need to be connected to the internet the first time for the Raspberry Pi Imager to download the OS that you choose. That OS will then be stored for future o"ine use. Being online for later uses means that the Raspberry Pi imager will always give you the latest version.


Then simply click the WRITE button
Wait for the Raspberry Pi Imager to finish writing
Once you get the following message, you can eject your SD card

Step 4 Connect your Raspberry Pi
Now get everything connected to your Raspberry Pi. It’s important to do this in the right order, so that all your components are safe.

Insert the SD card you’ve set up with Raspberry Pi OS into the microSD card slot on the underside of your Raspberry Pi.

Note: Many microSD cards come inside a larger adapter — you can slide the smaller card out using the lip at the bottom.

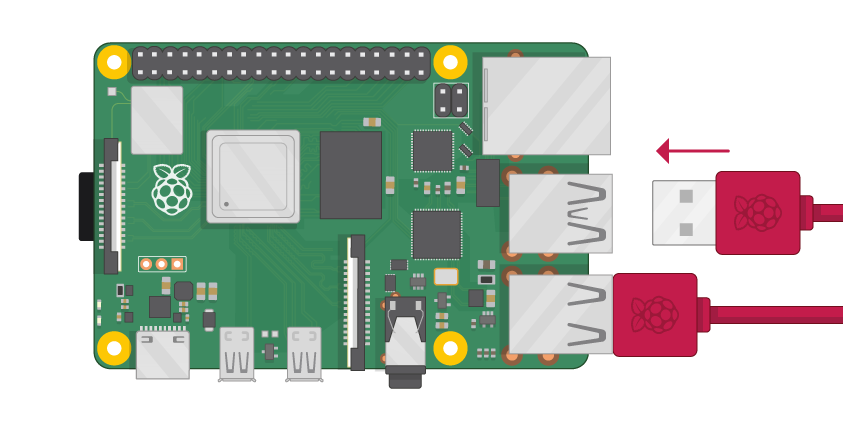
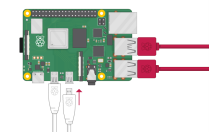
Find the USB connector end of your mouse’s cable, and connect the mouse to a USB port on Raspberry Pi (it doesn’t matter which port you use).

Connect the keyboard in the same way.
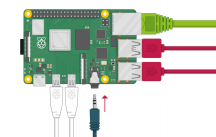
Make sure your screen is plugged into a wall socket and switched on.
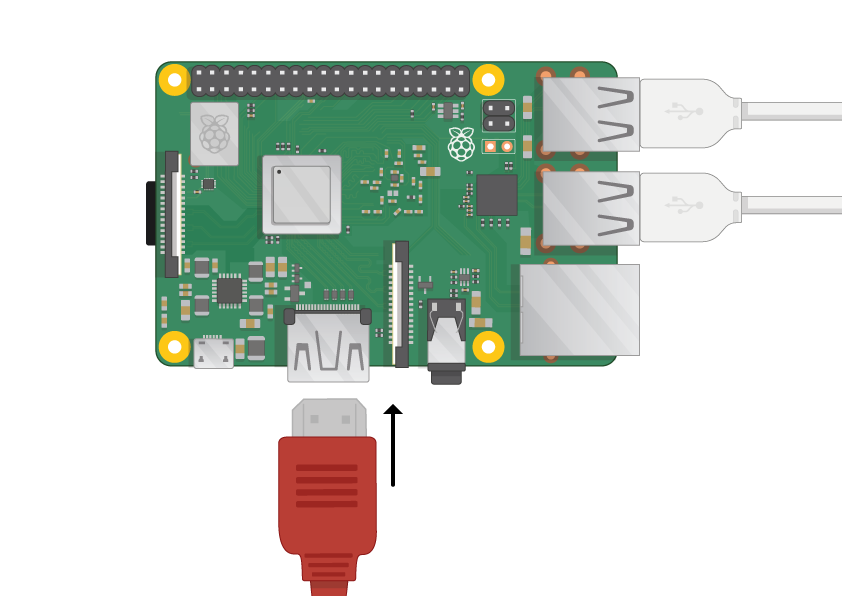
Look at the HDMI port(s) on your Raspberry Pi — notice that they have a flat side on top.
Use a cable to connect the screen to Raspberry Pi’s HDMI port — use an adapter if necessary.
Raspberry Pi 4
Connect your screen to the first of Raspberry Pi 4’s HDMI ports, labelled HDMI0.
Note: Make sure you have used HDMI0 (nearest the power in port) rather than HDMI1.

You can connect an optional second screen in the same way.

Raspberry Pi 1, 2, 3
Connect your screen to the single HDMI port.
Note: Nothing will display on the screen, because your Raspberry Pi is not running yet.
If you want to connect your Raspberry Pi to the internet via Ethernet, use an Ethernet cable to connect the Ethernet port on Raspberry Pi to an Ethernet socket on the wall or on your internet router. You don’t need to do this if you want to use wireless connectivity, or if you don’t want to connect to the internet.

If the screen you are using has speakers, sound will play through those. Alternatively, connect headphones or speakers to the audio port if you prefer.

Step 5 Start up your Raspberry Pi
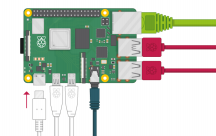
Your Raspberry Pi doesn’t have a power switch. As soon as you connect it to a power outlet, it will turn on.
Plug the power supply into a socket and connect it to your Raspberry Pi’s power port.

You should see a red LED light up on the Raspberry Pi, which indicates that Raspberry Pi is connected to power. As it starts up (this is also called booting), you will see raspberries appear in the top left-hand corner of your screen.

After a few seconds the Raspberry Pi OS desktop will appear.

Finishing the setup
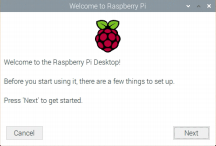
When you start your Raspberry Pi for the first time, the Welcome to Raspberry Pi application will pop up and guide you through the initial setup.

Click on Next to start the setup.
Set your Country, Language, and Timezone, then click on Next again.

Enter a new password for your Raspberry Pi and click on Next.

Connect to your wireless network by selecting its name, entering the password, and clicking on Next.

Note: If your model of Raspberry Pi doesn’t have wireless connectivity, you won’t see this screen.
Note: Wait until the wireless connection icon appears and the correct time is shown before trying to update the software. Click on Next, and let the wizard check for updates to Raspberry Pi OS and install them (this might take a little while).

Click on Restart to finish the setup.
Note: You will only need to reboot if that’s necessary to complete an update.

Step 6 Where to find help
If you’re having problems with your Raspberry Pi, there are lots of places you can get help and advice:
Check out the help section (https://www.raspberrypi.org/help/) and the troubleshooting guide (https://www.raspberrypi.org/learning/troubleshooting-guide/) on the Raspberry Pi website
The Raspberry Pi forum (https://www.raspberrypi.org/forums), including the Beginners (https://www.raspberrypi.org/forums/viewforum.php?f=91) section, is a great place to ask questions and get support from the Raspberry Pi community
Call out on Twitter (https://twitter.com) using the hashtag #rpilearn, or submit a question on the Raspberry Pi Stack Exchange (https://raspberrypi.stackexchange.com/)
You could also attend a free Raspberry Jam (https://rpf.io/jam) community event to talk to people about their experiences and get some first-hand help from fellow Raspberry Pi users
Step 7 What next?
Well done! You have just completed the first project in the Raspberry Pi for beginners (https://projects.raspberrypi.org/en/pathways/raspberry-pi-beginners) pathway. Next, try the second project in the pathway, Using your Raspberry Pi (https://projects.raspberrypi.org/en/projects/raspberry-pi-using/). The complete Raspberry Pi for beginners pathway
Setting up your Raspberry Pi (https://projects.raspberrypi.org/en/projects/raspberry-pi-setting-up/)
Using your Raspberry Pi (https://projects.raspberrypi.org/en/projects/raspberry-pi-using/)
Customise your Raspberry Pi desktop (https://projects.raspberrypi.org/en/projects/custom-pi-desktop/)
Pac-Man treasure hunt on the terminal (https://projects.raspberrypi.org/en/projects/pacman-terminal)
Create a new command on Raspberry Pi (https://projects.raspberrypi.org/en/projects/raspberry-pi-command/)
Other Raspberry Pi projects on the Raspberry Pi website
Take a look at some of our many other Raspberry Pi projects (https://projects.raspberrypi.org/en/projects?hardware%5B%5D=raspberry-pi).
Published by Raspberry Pi Foundation (https://www.raspberrypi.org) under a Creative Commons license (https://creativecommons.org/licenses/by-sa/4.0/). View project & license on GitHub (https://github.com/RaspberryPiLearning/raspberry-pi-setting-up)
Using Your Raspberry Pi
Using your Raspberry Pi 
How to configure, update, and navigate your Raspberry Pi once it's set up
Step 1 Introduction
Here you’ll learn how to use Raspberry Pi OS and some of its software, and how to adjust some key settings to your needs.
If you don’t have your Raspberry Pi up and running yet, check out our Setting up your Raspberry Pi (https://projects.raspberrypi.org/en/projects/raspberry-pi-setting-up) guide. We also have a three-week online course available on the FutureLearn platform (http://rpf.io/rpi-fl).
Step 2 Raspberry Pi Desktop
Your Raspberry Pi runs Raspberry Pi OS, a version of an operating system (OS) called Linux. (Windows and macOS are other common operating systems.) After Raspberry Pi OS starts up, you will see the Desktop appear.

The Raspberry Pi icon in the top left-hand corner is where you access the menu.
Click on it to find lots of applications, including Programming applications.
To open a text editor, click on Accessories and choose Text Editor.


Close the text editor by clicking the x in the top right-hand corner of the window.
Explore what other applications are currently available in the menu.
Note: The Raspberry Pi Imager gives the option to install Raspberry Pi OS Full, which comes with all recommended software already loaded, including o!ce applications and some games.
Step 3 Keyboard and mouse settings
To set up your mouse and keyboard, select Preferences and then Mouse and Keyboard Settings from the menu.

Mouse
You can change the mouse speed and double-click time here, and swap the buttons if you are left-handed.

Keyboard
You can adjust the key repeat delay and interval values here.

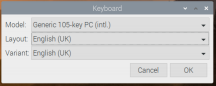
To change the keyboard layout, click on Keyboard Layout and select your layout from the list of countries.
Step 4 Connecting to the internet
If you want to connect your Raspberry Pi to the internet, you can plug an Ethernet cable into it (if you have a Raspberry Pi Zero, you’ll need a USB-to-Ethernet adapter as well). If your model is a Raspberry Pi 4, Raspberry Pi 3, or Raspberry Pi Zero W, you can also connect to a wireless network.
Connecting to a wireless network
Click on the wireless network icon in the top right-hand corner of the screen, and select your network from the drop-down menu.
Type in the password for your wireless network, then click on OK.

Once your Raspberry Pi is connected to the internet, you will see a wireless LAN symbol instead of the red crosses.
Test your connection by clicking on the web browser icon and searching the web for raspberry pi.

Step 5 Setting up the sound
Your Raspberry Pi can either send sound to the screen’s built-in speakers through the HDMI connection (if your screen has speakers), or to the analogue headphone jack.
Right-click on the speaker icon in the top right-hand corner, and select Audio Outputs, to choose whether your Raspberry Pi should use the HDMI or the AV Jack connection for sound.

Click on the speaker icon to adjust the volume by moving the slider up or down.

Step 6 Installing software
There are many, many software programs and applications you can download and install on Raspberry Pi. Note: Your Raspberry Pi has to be connected to the internet (4) before you can install software.
In the menu, click on Preferences and then on Recommended Software.

You can browse all the recommended software, or filter it by category.

To install a piece of software, click to mark the checkbox to its right.
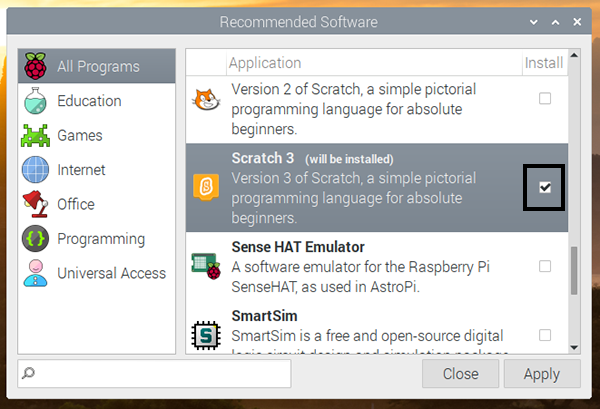
Then click on OK to install the selected software.

In addition to the Raspberry Pi’s recommended software, there’s a huge library of other available programs and applications. Click on Preferences and then on Add / Remove Software in the menu.
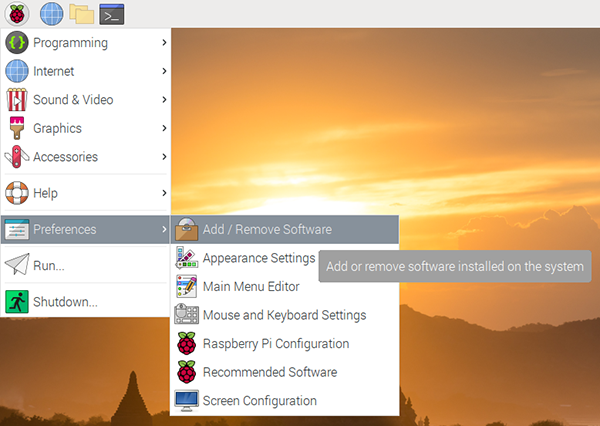
You can search for software, or browse by selecting a category from the menu on the left.

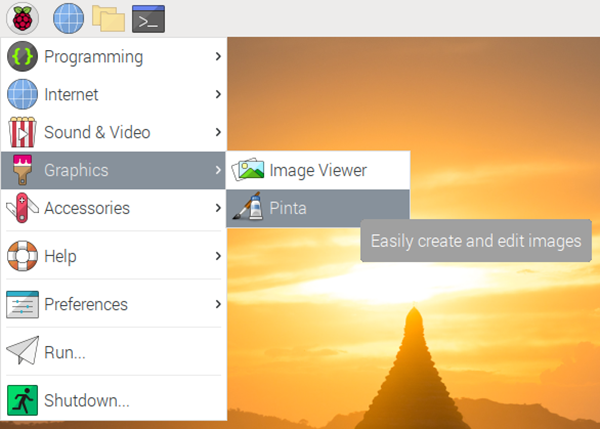
Try installing a drawing application called Pinta.
Type ‘pinta’ into the search box and press Enter.
Select Simple drawing/painting program in the list that appears.

Click on OK to start the installation process.
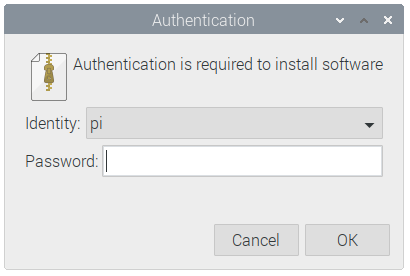
When prompted, enter your password; if you haven’t changed the password, it will be ‘raspberry’.

Pinta will now be downloaded and installed.

When the process is complete, open Pinta by selecting Graphics and then Pinta from the menu.
Step 7 Updating your Raspberry Pi
It’s a good idea to regularly update the software on your Raspberry Pi with the latest features and fixes.
You can update your Raspberry Pi using the Add / Remove Software application: open it by selecting it from the Preferences section of the menu.

Before you check and install any updates, you should refresh the software package lists on your Raspberry Pi.
Click on Options in the top left-hand corner, and select Refresh Package Lists.

Your Raspberry Pi will then update all lists of packages.

When this is done, click on Options and select Check for Updates.

The Package Updater will open and automatically check whether updates are available. It will display anything it finds in a list.

Click on Install Updates to install all the available updates.
When prompted, enter your password; if you haven’t changed the password, it will be ‘raspberry’.
The updates will then be downloaded and installed. You can see the installation by checking the progress bar in the bottom left-hand corner.
Step 8 Accessing your files
All the files on your Raspberry Pi, including the ones you create yourself, are stored on the SD card. You can access your files using the File Manager application. Click on Accessories and then on File Manager in the menu, or select the File Manager icon on the menu bar.

When the File Manager opens, you will be shown the pi directory — this is where you can store your files and create new subfolders.

Double-click on the Documents icon to open the directory and view the files inside.

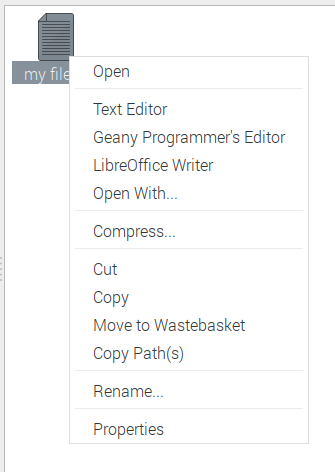
To open a file, double-click on its name, or right-click on it to open the file menu for more options.
You can use USB drives and sticks with your Raspberry Pi. This is a convenient way of backing up your files and copying them to other computers. Insert a USB stick into your Raspberry Pi. A window will pop up, asking what action you want to perform.

Click on OK to Open in File Manager.
The File Manager will open and show you the files on your USB stick.

Step 9 Using the Terminal
The terminal is a really useful application: it allows you to navigate file directories and control your Raspberry Pi using typed commands instead of clicking on menu options. It’s often in many tutorials and project guides, including the ones on our website.
To open a terminal window, click on the Terminal icon at the top of the screen, or select Accessories and then Terminal in the menu.

You can type commands into the terminal window and run them by pressing Enter on your keyboard.
In the terminal window, type:
ls |
Then press Enter on the keyboard.
The command ls lists all the files and subdirectories in the current file directory. By default, the file directory that the terminal accesses when you open it is the one called pi.
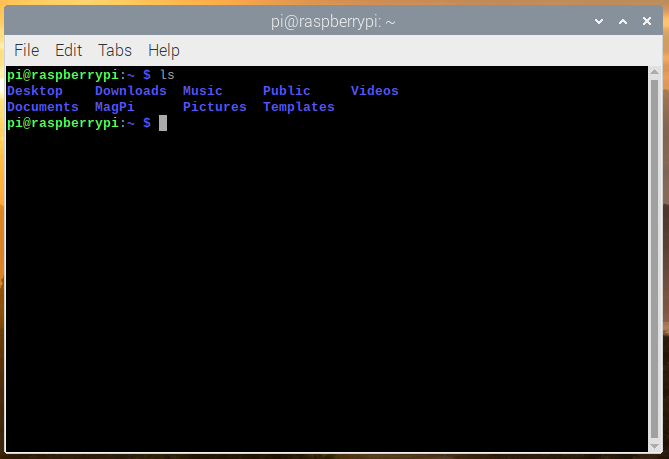
Now type in this command to change directory to the Desktop.
cd Desktop |
You have to press the Enter key after every command.
Use the command ls to list the files in the Desktop directory.
ls |

The terminal can do a lot more than list files — it’s a very powerful way of interacting with your Raspberry Pi!
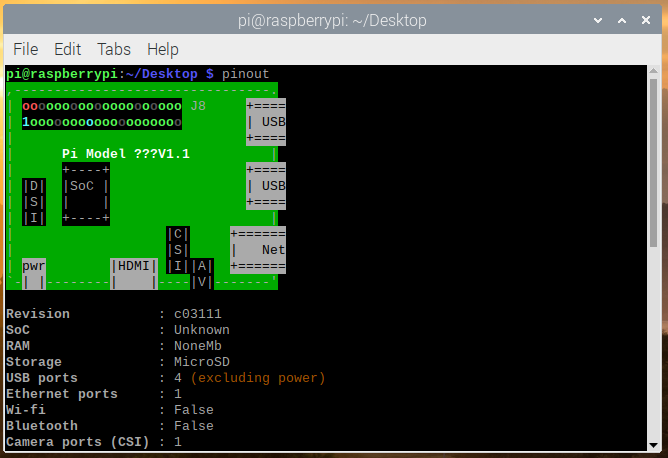
As just one small example, try the command pinout:
pinout |
This will show you a labelled diagram of the GPIO pins, and some other information about your Raspberry Pi.
Close the terminal window by clicking on the x in the top right-hand corner, or using the command exit.
Step 10 Configuring your Raspberry Pi
You can control most of your Raspberry Pi’s settings, such as the password, through the Raspberry Pi Configuration application found in Preferences on the menu.
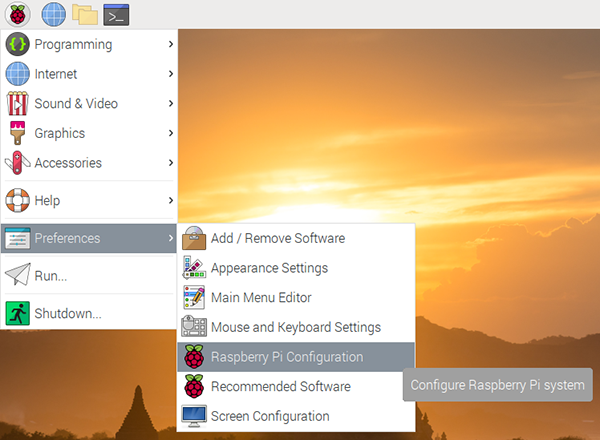
System
In this tab you can change basic system settings of your Raspberry Pi.

Password — set the password of the pi user (it is a good idea to change the password from the factory default ‘raspberry’)
Boot — select to show the Desktop or CLI (command line interface) when your Raspberry Pi starts
Auto Login — enabling this option will make the Raspberry Pi automatically log in whenever it starts
Network at Boot — selecting this option will cause your Raspberry Pi to wait until a network connection is available before starting
Splash Screen — choose whether or not to show the splash (startup) screen when your Raspberry Pi boots
Interfaces
You can link devices and components to your Raspberry Pi using a lot of di"erent types of connections. The Interfaces tab is where you turn these di"erent connections on or o", so that your Raspberry Pi recognises that you’ve linked something to it via a particular type of connection.
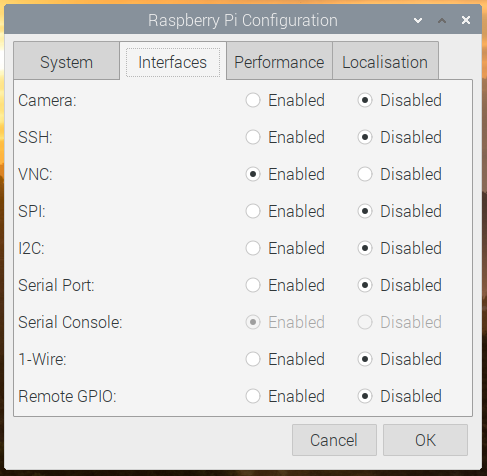
Camera — enable the Raspberry Pi Camera Module (https://www.raspberrypi.org/products/camera-module-v2/) SSH — allow remote access to your Raspberry Pi from another computer using SSH
VNC — allow remote access to the Raspberry Pi Desktop from another computer using VNC
SPI — enable the SPI GPIO pins
I2C — enable the I2C GPIO pins
Serial — enable the Serial (Rx, Tx) GPIO pins
1-Wire — enable the 1-Wire GPIO pin
Remote GPIO — allow access to your Raspberry Pi’s GPIO pins from another computer
Performance
If you need to do so for a particular project you want to work on, you can change the performance settings of your Raspberry Pi in this tab. Warning: Changing your Raspberry Pi’s performance settings may result in it behaving erratically or not working.

Overclock — change the CPU speed and voltage to increase performance
GPU Memory — change the allocation of memory given to the GPU
Localisation

This tab allows you to change your Raspberry Pi settings to be specific to a country or location. Locale — set the language, country, and character set used by your Raspberry Pi Timezone — set the time zone
Keyboard — change your keyboard layout
WiFi Country — set the WiFi country code
Step 11 How to get help
If you are experiencing problems with your Raspberry Pi, there are lots of ways you can get help and advice:
Check out the help section (https://www.raspberrypi.org/help/) and the troubleshooting guide (https://www.raspberrypi.org/learning/troubleshooting-guide/) on raspberrypi.org (https://www.raspberrypi.org)
The Raspberry Pi forum (https://www.raspberrypi.org/forums), including the Beginners (https://www.raspberrypi.org/forums/viewforum.php?f=91) section, is a great place to ask questions and get support from the Raspberry Pi community
Call out on Twitter (https://twitter.com) using the hashtag #rpilearn, or submit a question on the Raspberry Pi Stack Exchange (https://raspberrypi.stackexchange.com/)
You could also attend a free Raspberry Jam (https://rpf.io/jam) community event to talk to people about their experiences and get some first-hand help from fellow Raspberry Pi users
Step 12 What next?
Well done! You have just completed the second project in the Raspberry Pi for beginners (https://projects.raspberrypi.org/en/pathways/raspberry-pi-beginners) pathway. Next, try the third project in the pathway, Customise your Raspberry Pi desktop (https://projects.raspberrypi.org/en/projects/custom-pi-desktop/). The complete Raspberry Pi for beginners pathway
Setting up your Raspberry Pi (https://projects.raspberrypi.org/en/projects/raspberry-pi-setting-up/)
Using your Raspberry Pi (https://projects.raspberrypi.org/en/projects/raspberry-pi-using/)
Customise your Raspberry Pi desktop (https://projects.raspberrypi.org/en/projects/custom-pi-desktop/)
Pac-Man treasure hunt on the terminal (https://projects.raspberrypi.org/en/projects/pacman-terminal)
Create a new command on Raspberry Pi (https://projects.raspberrypi.org/en/projects/raspberry-pi-command/)
Other Raspberry Pi projects on the Raspberry Pi website
Take a look at some of our many other Raspberry Pi projects (https://projects.raspberrypi.org/en/projects?hardware%5B%5D=raspberry-pi).
Published by Raspberry Pi Foundation (https://www.raspberrypi.org) under a Creative Commons license (https://creativecommons.org/licenses/by-sa/4.0/). View project & license on GitHub (https://github.com/RaspberryPiLearning/raspberry-pi-using)
Getting Started With Raspberry Pi
Getting started with Raspberry Pi 
Set up your Raspberry Pi and explore what it can do
Step 1 Introduction
In this project you will connect up a Raspberry Pi computer and find out what it can do.
Note: this guide is an introduction to the Raspberry Pi computer, there are also detailed guides to Setting up your Raspberry Pi (https://rpf.io/setting-up) and Using your Raspberry Pi (http://rpf.io/using).
What you will make
The Raspberry Pi is a small computer that can do lots of things. You plug it into a monitor and attach a keyboard and mouse.

What you will learn
This project covers elements from the following strands of the Raspberry Pi Digital Making Curriculum (http://rpf.io/curriculum):
Use basic digital, analogue, and electromechanical components (https://curriculum.raspberrypi.org/physical-computing/creator/)
Step 2 What you will need
Hardware
A Raspberry Pi computer with an SD card or micro SD card
A monitor with a cable (and, if needed, an HDMI adaptor)
A USB keyboard and mouse
A power supply
Headphones or speakers (optional)
An ethernet cable (optional)
Software
Raspberry Pi OS, installed using the Raspberry Pi Imager (https://www.raspberrypi.org/downloads/)
Step 3 Meet Raspberry Pi
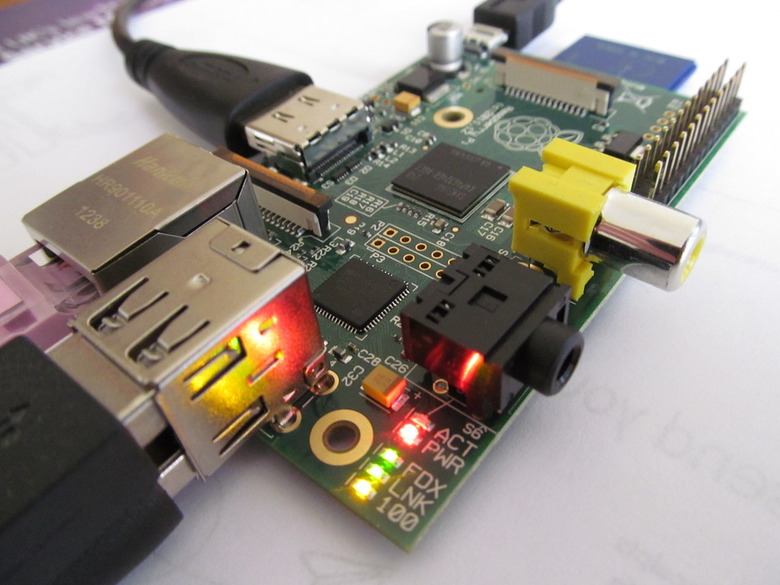
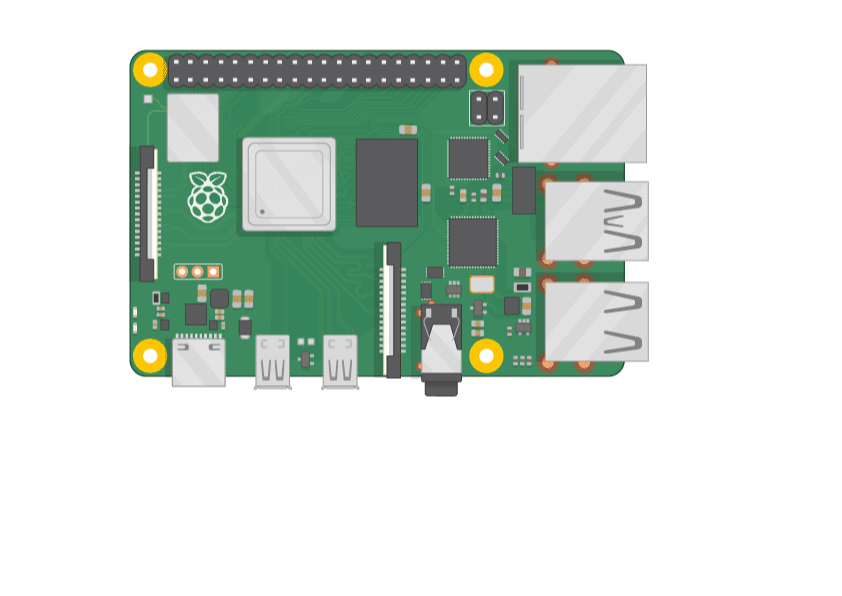
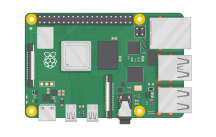
You are going to take a first look at Raspberry Pi! You should have a Raspberry Pi computer in front of you for this. The computer shouldn’t be connected to anything yet. Look at your Raspberry Pi. Can you find all the things labelled on the diagram?

USB ports — these are used to connect a mouse and keyboard. You can also connect other components, such as a USB drive.
SD card slot — you can slot the SD card in here. This is where the operating system software and your files are stored.
Ethernet port — this is used to connect Raspberry Pi to a network with a cable. Raspberry Pi can also connect to a network via wireless LAN.
Audio jack — you can connect headphones or speakers here.
HDMI port — this is where you connect the monitor (or projector) that you are using to display the output from the Raspberry Pi. If your monitor has speakers, you can also use them to hear sound.
Micro USB power connector — this is where you connect a power supply. You should always do this last, after you have connected all your other components. GPIO ports — these allow you to connect electronic components such as LEDs and buttons to Raspberry Pi.
Step 4 Connect your Raspberry Pi
Let’s connect up your Raspberry Pi and get it running.
Check the slot on the underside of your Raspberry Pi to see whether an SD card is inside. If no SD card is there, then insert an SD card with Raspbian installed (via NOOBS).

Note: Many microSD cards come inside a larger adapter — you can slide the smaller card out using the lip at the bottom.

Find the USB connector end of your mouse’s cable, and connect the mouse to a USB port on your Raspberry Pi (it doesn’t matter which port you use).

Connect the keyboard in the same way.

Make sure your screen is plugged into a wall socket and switched on.
Look at the HDMI port(s) on your Raspberry Pi — notice that they have a flat side on top.
Use a cable to connect the screen to the Raspberry Pi’s HDMI port — use an adapter if necessary.
Raspberry Pi 4
Connect your screen to the first of Raspberry Pi 4’s HDMI ports, labelled HDMI0.

You could connect an optional second screen in the same way.
Raspberry Pi 1, 2, 3
Connect your screen to the single HDMI port.

Note: nothing will display on the screen, because the Raspberry Pi is not running yet.
If you want to connect the Pi to the internet via Ethernet, use an Ethernet cable to connect the Ethernet port on the Raspberry Pi to an Ethernet socket on the wall or on your internet router. You don’t need to do this if you want to use wireless connectivity, or if you don’t want to connect to the internet.

If your screen has speakers, your Raspberry Pi can play sound through these. Or you could connect headphones or speakers to the audio port.
Plug the power supply into a socket and then connect it to your Raspberry Pi’s USB power port.
You should see a red light on your Raspberry Pi and raspberries on the monitor.
Your Raspberry Pi then boots up into a graphical desktop.

Step 5 Finish the setup
When you start your Raspberry Pi for the first time, the Welcome to Raspberry Pi application will pop up and guide you through the initial setup.
Click Next to start the setup.
Set your Country, Language, and Timezone, then click Next again.

Enter a new password for your Raspberry Pi and click Next.

Connect to your WiFi network by selecting its name, entering the password, and clicking Next.
Note: if your Raspberry Pi model doesn’t have wireless connectivity, you won’t see this screen.
Click Next let the wizard check for updates to Raspbian and install them (this might take a little while).

Click Done or Reboot to finish the setup.
Note: you will only need to reboot if that’s necessary to complete an update.

Step 6 A tour of Raspberry Pi
Now it’s time to take a tour of your Raspberry Pi.
Do you see the raspberry symbol in the top left-hand corner? That’s where you access the menu: click on it to find lots of applications. Click on Accessories, and then click on Text Editor.

Type I just built a Raspberry Pi computer in the window that appears.

Click on File, then choose Save, and then click on Desktop and save the file as rp.txt.

You should see an icon named rp.txt appear on the desktop.

Your file has been saved to your Raspberry Pi’s SD card.
Close the text editor by clicking the X in the top right-hand corner of the window.
Return to the menu, click on Shutdown, and then click on Reboot.
When Raspberry Pi has rebooted, your text file should still be there on the desktop.
Raspberry Pi runs a version of an operating system called Linux (Windows and macOS are other operating systems). This operating system allows you to make things happen by typing in commands instead of clicking on menu options. To try this out, click on the Terminal symbol at the top of the screen:
In the window that appears, type:
ls |
and then press Enter on the keyboard.
You can now see a list of the files and folders in your home directory.
Now type this command to change directory to the Desktop:
cd Desktop |
You have to press the Enter key after every command.
Then type:
ls |
Can you see the text file you created?
Close the terminal window by clicking on the X.
Now drag rp.txt to the Wastebasket on the desktop so the Raspberry Pi will be tidy for the next person using it.

Step 7 Browsing the web
You might want to connect your Raspberry Pi to the internet. If you didn’t plug in an ethernet cable or connect to a WiFi network during the setup, then you can connect now.
Click the icon with red crosses in the top right-hand corner of the screen, and select your network from the drop-down menu. You may need to ask an adult which network you should choose.
Type in the password for your wireless network, or ask an adult to type it for you, then click OK.

When your Pi is connected to the internet, you will see a wireless LAN symbol instead of the red crosses.
Click the web browser icon and search for raspberry pi.

Step 8 Challenge: explore your Raspberry Pi
Take a tour of the menu — can you find:
A version of Scratch?
A Python game to play?
A version of Minecraft that you can program?
Published by Raspberry Pi Foundation (https://www.raspberrypi.orghttps://www.raspberrypi.org) under a Creative Commons license (https://creativecommons.org/licenses/by-sa/4.0/). View project & license on GitHub (https://github.com/RaspberryPiLearning/raspberry-pi-getting-started)
Activities For Beginners
![]()
Lost in Space: Learn How to Program Your Own Animation!