Data warehouse Design Using Oracle
Unit Objective:
4.1 Partition in Data warehousing
Data warehousing has very large tables.For managing large table decompose the large table into small size table based on data values in the table. For example all January month information stored in the partition called “partition_jan”. Otherwise store every 1000 employee’s information “1k_partition” partition. 1001-2000 employee information in “2k_partition” partition. Partition is useful for enhancing query performance in the data warehousing. Add new partition, merge partition, split partition is useful for organizing data within the data warehousing.
4.2 Tablespace
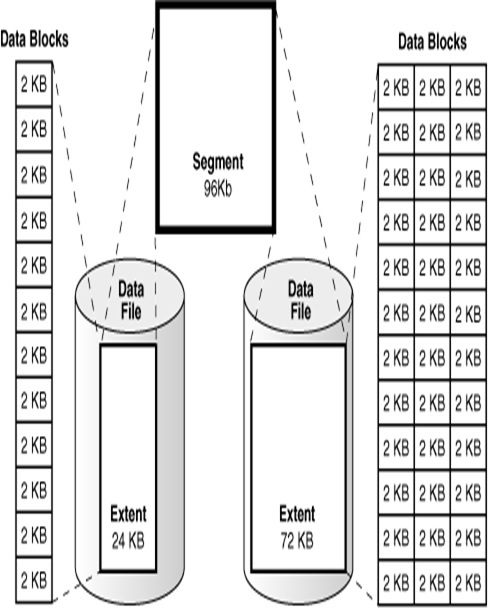
Oracle Database allocates logical space for all data in the database.The logical units of database space allocation are data blocks, extents, segments, and tablespaces. Each allocation are related with 1:n relationship i.e one tablespace has many segment, one segment has many extent. At a physical level, the data is stored in data files on disk. The data in the data files is stored in operating system blocks.

tablespace
Data blocks are the smallest units storing data in the oracle database. An extent is a set of logically contiguous data blocks allocated for storing a specific type of information.A segment is a set of extents allocated for a specific database object, such as a table. Each segment belongs to one and only one tablespace.
extent
The database has one or more table space. Table space is called as logical storage unit within an oracle database. The meaning of logical is table space is not visible in the file system. Table space has at least had one data file. Each table space has unique data file. Each table space is divided into based on the size mentioned in the “Create tablespace” statement. The table space builds the bridge between the oracle database and the file system in which the table’s or index data is stored.
CREATE TABLESPACE dwuser01a
DATAFILE 'c:\temp\dwuser1a.dbf' SIZE 40M
BLOCKSIZE 8192
EXTENT MANAGEMENT LOCAL UNIFORM SIZE 256K
SEGMENT SPACE MANAGEMENT AUTO ONLINE;
Each data file should be unique in tablespace, i.e you can't create again dwuser1a.dbf again in the same tablespace dwuser01a.
4.3 Various types of Oracle Partition
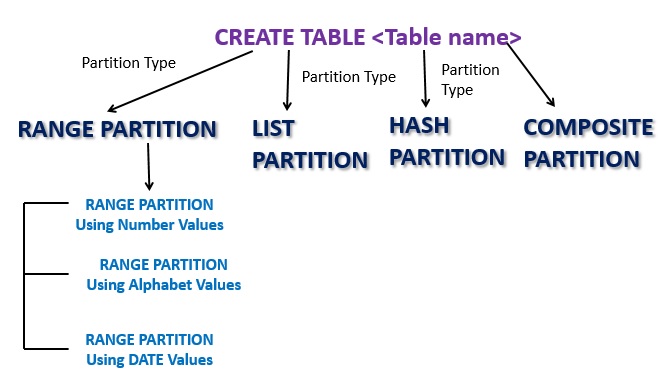
PARTITION TYPES
4.4 Range Partition
4.4.1 Range Partition Using Number
create table interval_part(pid number(5) not null,fname varchar2(30), lname varchar2(30) )
partition by range(pid)
(partition p1 values less than(101))
tablespace dwuser01a;
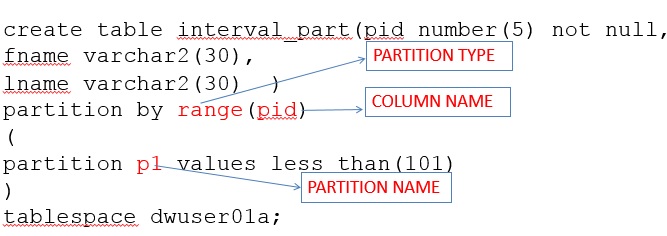
range partition using Number
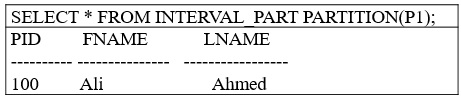
Insert values into the interval_part and check whether the records are storing in the assign partition
Insert into INTERVAL_PART values(100,’Ali’,’Ahmed’);
Insert into INTERVAL_PART values(101,’Zahra’,’Khamis’);
As per given condition, the maximum value is 100, it will store only the first record only. It will give error message, for the value of product id 101 no partition was assigned.

error out of range
The USER_TAB_PARTITIONS describes the partition information as name of the partition, tablespace name, storage parameter or value range of the partition .

user_tab_partition
Display the values stored in the partition.
display partition values
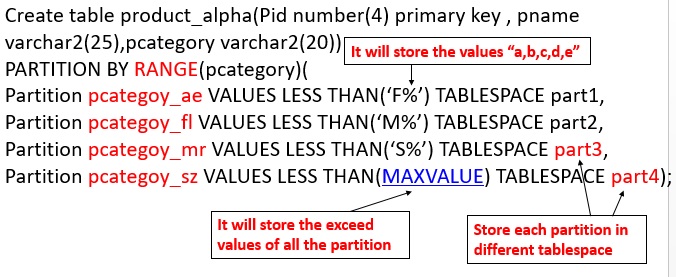
4.4.2 Range Partition using Alphabet
range partition using character
Range partition using partition key based on character based values. This type of partition is useful for based on location name, country and supplier based analysis in the data warehousing. This is the alternative to numeric based values.
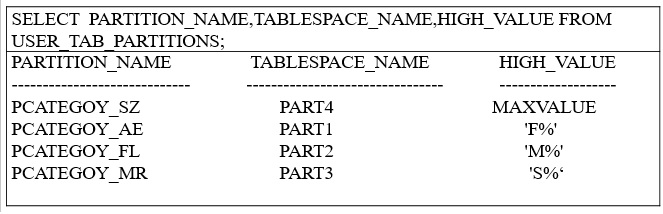
display range partition
Insert into Product_alpha values(100,’Sony LCD 32”’,’TV’);
Insert into Product_alpha values(200,’Sony POWER SHOT’,’CAMERA’);
Insert into Product_alpha values(300,’Sony 3G Dual SIM’,’MOBILE’);
Insert into product_alpha values(400,’Cannon Digit power’, ’DIGITAL CAMERA’);
4.4.3 Range Partition Using Date
The partition key in the range partition to be Date based. It is useful for analyzing table data week wise or day wise.
CREATE TABLE Productrange_date (
Pid number(4) Primary key,pname varchar2(25),expdate date NOT Null)
PARTITION BY RANGE(expdate)(
PARTITION yr0 VALUES LESS THAN (TO_DATE('01-JAN-2007','DD-MON-YYYY')) TABLESPACE part1,
PARTITION yr1 VALUES LESS THAN (TO_DATE('01-JAN-2008','DD-MON-YYYY')) TABLESPACE part2,
PARTITION yr2 VALUES LESS THAN (TO_DATE('01-JAN-2009','DD-MON-YYYY')) TABLESPACE part3,
PARTITION yr3 VALUES LESS THAN (MAX VALUE) TABLESPACE part4);
INSERT INTO Productrange_date VALUES (1001, ‘Orange’, ’21-MAY-08’);
INSERT INTO Productrange_date VALUES (1002, ‘Sugar’, ’16-MAY-09’);
INSERT INTO Productrange_date VALUES (1003, ‘Biscuit’, ’12-NOV-09’);
SQL>
select * from productrange_date;
PID PNAME EXPDATE
---------- ------------------------- -------------
1001 Orange 21-MAY-08
1002 Sugar 16-MAY-09
1003 Biscuit 12-NOV-09
SELECT * FROM productrange_date PARTITION(yr1);
no rows selected
SELECT * FROM productrange_date PARTITION(yr2);
PID PNAME EXPDATE
---------- -- ------------- -------------
1001 Orange 21-MAY-08
SELECT * FROM productrange_date PARTITION(yr3);
PID PNAME EXPDATE
--------- --------------- -------------
1002 Sugar 16-MAY-09
1003 Biscuit 12-NOV-09
4.5 ALTER TABLE ...PARTITION
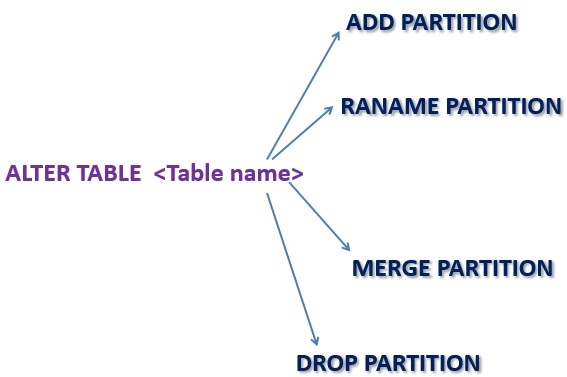
ALTER TABLE...PARTITION
4.5.1 ADD PARTITION
Using Alter table – ADD Partition statement, it is possible to insert new partition details of already existed partition
Alter table INTERVAL_PART ADD partition p2 values less than(201);
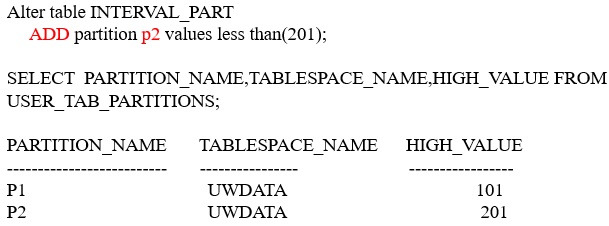
add partition
Insert into INTERVAL_PART values(101,'zahra','khamis');
Insert into INTERVAL_PART values(200,'Mohammed','omar');
SELECT * FROM INTERVAL_PART;
PID FNAME LNAME
---------- ------------------------- --------------
100 Ali Ahmed
101 Zahra Khamis
200 Mohammed Omar
SELECT * FROM INTERVAL_PART partition(P1);
PID FNAME LNAME
---------- ------------------------- --------------
100 Ali Ahmed
SELECT * FROM INTERVAL_PART partition(P2);
PID FNAME LNAME
---------- ------------------------- --------------
101 Zahra Khamis
200 Mohammed Omar
4.5.2 Rename Partition
ALTER TABLE INTERVAL_PART RENAME PARTITION P1 TO P9;

rename partition
4.5.3 Merge Partition
Alter table productrange_date merge partitions yr2,yr3 into partition yr6;
SELECT * FROM productrange_date PARTITION(yr6)

fig4-38_merge_partition.pngMerge partition
Merge partition
4.5.4 Drop Partition
SELECT * FROM Product_alpha;
PID PNAME PCATEGORY
---------- ----------------------------- --------------------
200 Sony POWER SHOT CAMERA
400 Cannon Digit power DIGITAL CAMERA
300 Sony 3G Dual SIM MOBILE
100 Sony LCD 32" TV
SELECT * FROM Product_alpha PARTITION(PCATEGOY_AE);
PID PNAME PCATEGORY
---------- --------------------------- --------------------
200 Sony POWER SHOT CAMERA
400 Cannon Digit power DIGITAL CAMERA
Alter table Product_alpha drop partition pcategoy_ae;
it merely updates the data dictionary to indicate that the pcategoy_AE partition no longer belongs to the Product_alpha table. It also remove the partition values from the table.
SELECT * FROM Product_alpha;
PID PNAME PCATEGORY
---------- ----------------------------- --------------------
300 Sony 3G Dual SIM MOBILE
100 Sony LCD 32" TV
4.6 List Partition
List partition is organizing the data allows unordered and unrelated sets of data to be grouped and organized together. It is controls each and every row values and mapping with partition. The syntax of list partition is three parts:
1) partition method: Partition by list
2) Specify the partition column, example (slocation)
3) Partition description: Partition “partition_name” values (list of values)
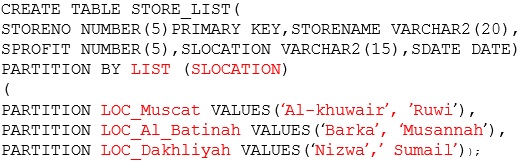
list partition
Display the values in the list partition
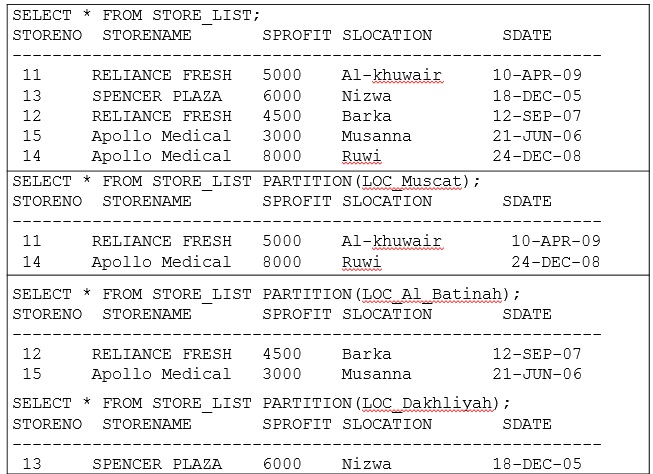
display list values
4.6.1 LIST PARTITION ADD PARTITION USING “DEFAULT” VALUE
The special capability of list partition is default partition. The benefit of using default partition is, it don’t generate an error suppose all rows don’t map with any partition in the list. Using alter table statement, it is possible to add new partition in the already existed list partition.
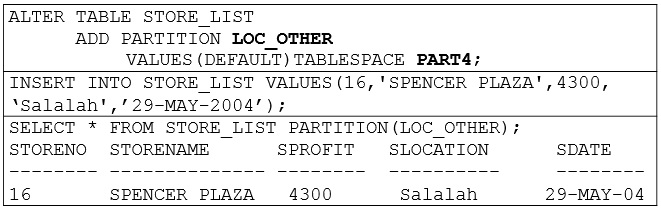
Default values in the List partition
4.6.2 ALTER TABLE MODIFY PARTITION

alter table.. modify
4.6.2.1 ALTER TABLE MODIFY..ADD
In the list partition “LOC_MUSCAT” partition had values “SEEB, BOWSHER”. Suppose to change already existed list value in the list partition, use ALTER TABLE –MODIFY statement to add the new values.
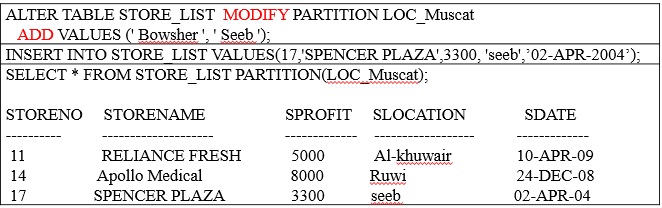
Alter table modify ..add
4.6.2.1 ALTER TABLE MODIFY... DROP
Suppose to remove particular list value from the partition, that partition has the specific values then oracle trigger the error. The partition doesn’t have that values or data then error free. Avoiding the error message, first delete the specific values in the partition and then drop the values from the list partition.
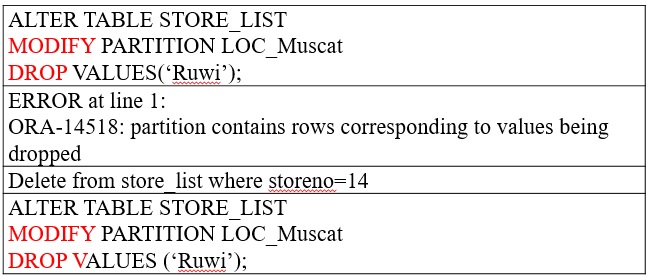
alter table modify ..drop
4.7 Hash Partition
Hash partition is using hashing algorithm. The key feature of hashing algorithm into it evenly distributes rows among partitions, so all the partitions are almost the same size. This feature is useful for spreading the data into sufficient number of devices to maximizing the I/O devices. The oracle database uses a linear hashing algorithm. Suppose any add or merge a hashed partition, the oracle automatically rearranges the rows within the partition and sub partition. In the hash partition no need to mention value range to store like range partition and also like list partition no need the mention exact list value to store in partition.
CREATE TABLE products(partno NUMBER,
description VARCHAR2 (60))
PARTITION BY HASH (partno)
(PARTITION partno1 TABLESPACE part1,
PARTITION partno2 TABLESPACE part2,
PARTITION partno3 TABLESPACE part3,
PARTITION partno4 TABLESPACE part4);
Insert into products values(11,’ice cream’);
Insert into products values(12,’coffee’);
Insert into products values(13,’tea’);
Insert into products values(14,’sugar’);
SELECT * FROM products partition(partno1);
PARTNO DESCRIPTION
---------- ------------------------------------
11 ice cream
13 tea
SELECT * FROM products partition(partno2);
PARTNO DESCRIPTION
---------- -----------------------------------
12 coffee
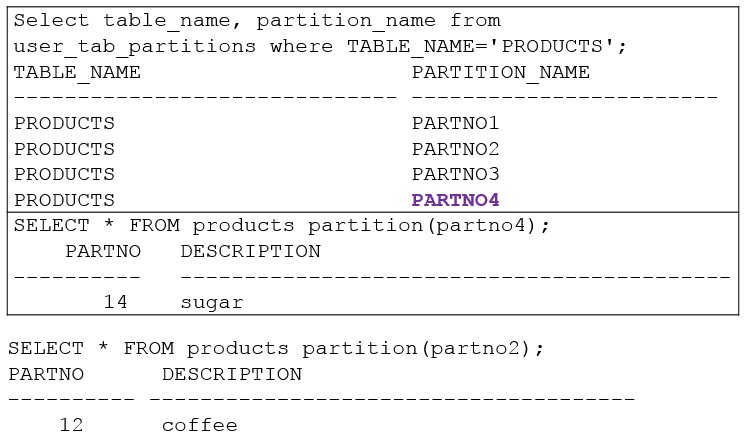
SELECT * FROM products partition(partno4);
PARTNO DESCRIPTION
---------- -----------------------------------
14 sugar

hash partition
4.7.1 HASH PARTITION Using Coalescing
coalsec
Coalescing partitions is a way of reducing the number partitions in a hash-partitioned table. When a hash partition is coalesced, its contents are redistributed into one or more remaining partitions determined by the hash function. The specific partition that is coalesced is selected by oracle, and is dropped after its contents have been redistributed. Here PARTNO4 is dropped and PARTNO4 partition values are distributed into PARTNO2 partition.
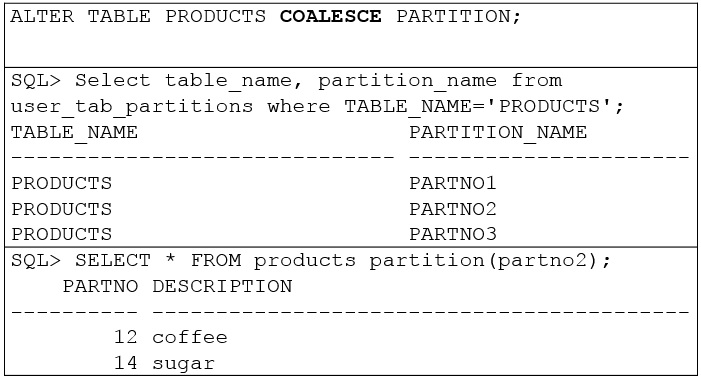
coalsec partition -hash
4.7.2 Compare Truncate, drop, coalsec
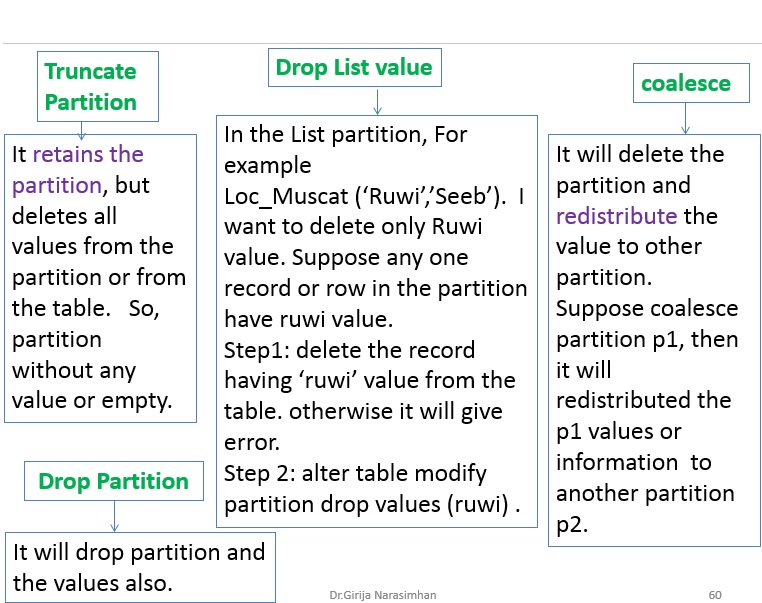
compare drop, truncate, drop list
4.8 Composite partition
Composite partitioning is a combination of the two partition method. Table is partitioned by one data distribution method for example Range Partition. Each partition is further subdivided into another Partition method for example List. The types of composite partitioning are:
Composite Range-Range Partitioning
Composite Range-Hash Partitioning
Composite Range-List Partitioning
Composite List-Range Partitioning
Composite List-Hash Partitioning
Composite List-List Partitioning
Composite Hash-Hash Partitioning
Composite Hash-List Partitioning
Composite Hash-Range Partitioning
Composite Partitioned Table - By Range And List
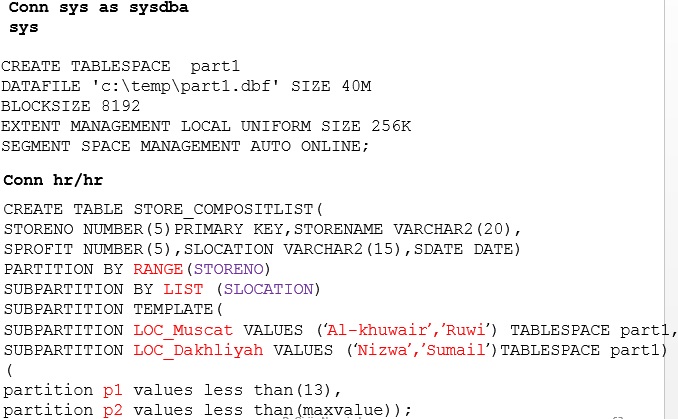
composite partition
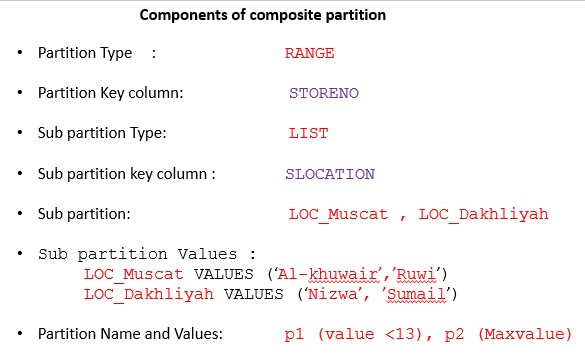
components of composite partition
insert into store_compositlist values(11,'Reliance Fresh',500,'Al-khuwair','10-apr-17');
insert into store_compositlist values(12,'Reliance Fresh',450,'Sumail','12-sep-17');
insert into store_compositlist values(13,'Spencer Plaza',600,'Nizwa','11-Nov-17');
insert into store_compositlist values(14, 'Apollo Medical',300,'Ruwi','21-Jun-17');
insert into store_compositlist values(15,'Apollo Medical',800,'Ruwi','27-may-17');
Display the partition Information
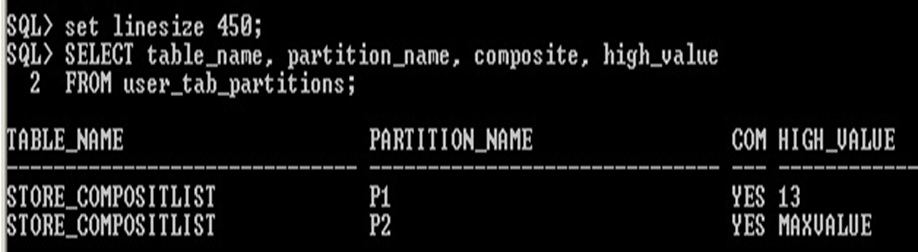
Display partition composite partition information
Display the sub partition information
SELECT table_name, partition_name, subpartition_name, num_rows FROM user_tab_subpartitions;
Here Num_rows column is empty. For getting values in the Num_rows column analyze the statistics.
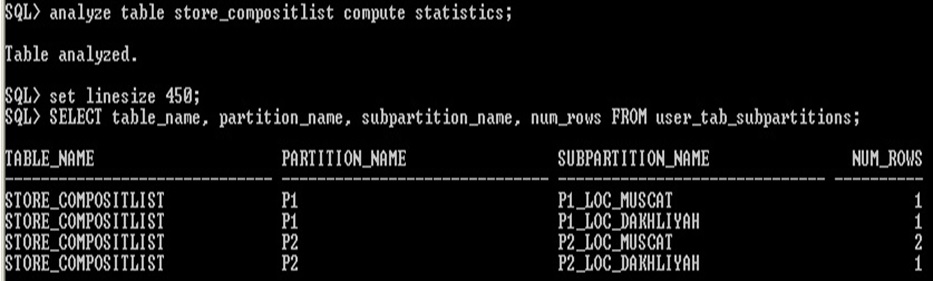
sub partition compute statistics
Display the Partition values in the partition P1 and P2
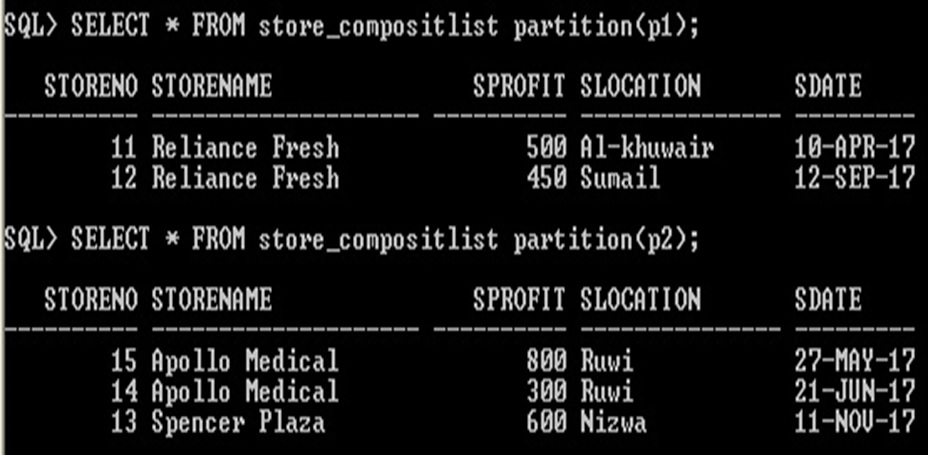
Display the Partition Values
Display the Sub Partition values, don’t give sub partition name, then it will give error message. <partition name> _<subpartition name> in the select statement
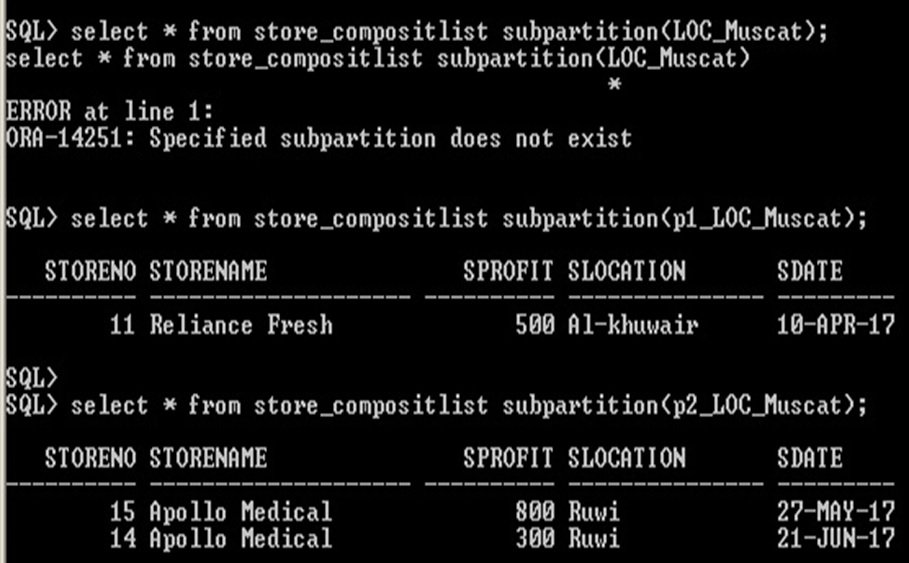
subpartition_values
4.9 PARTITIONED INDEX
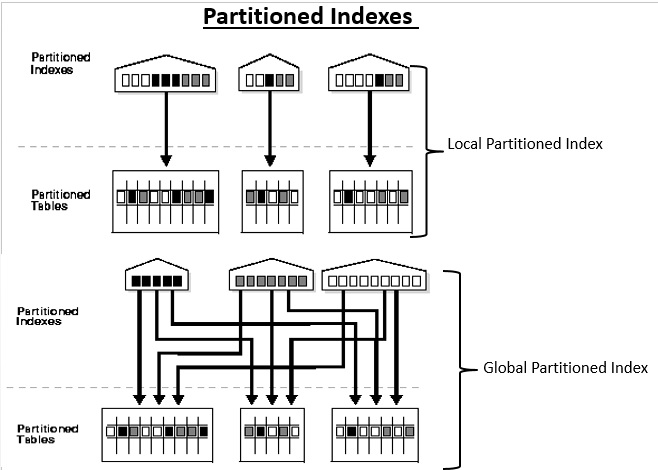
partition index
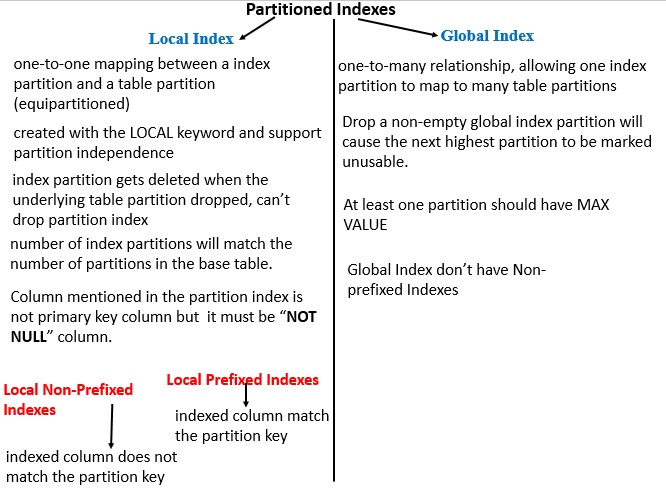
local vs. global index
4.9.1 Local Index
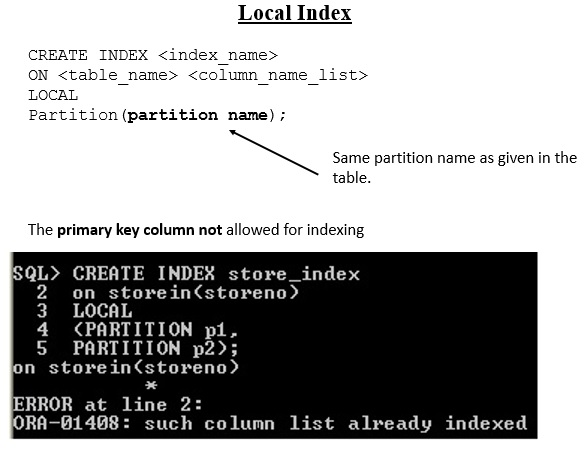
local index
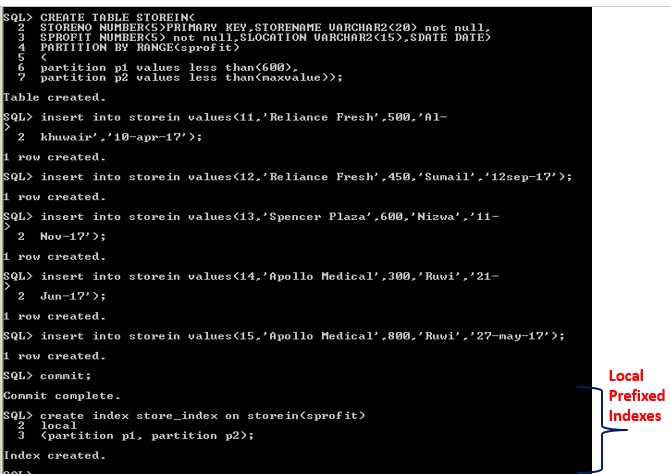
Local Prefixed index
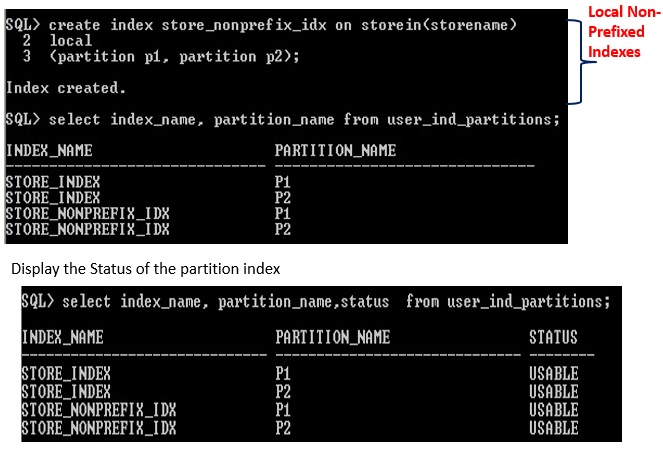
Local non prefixed index
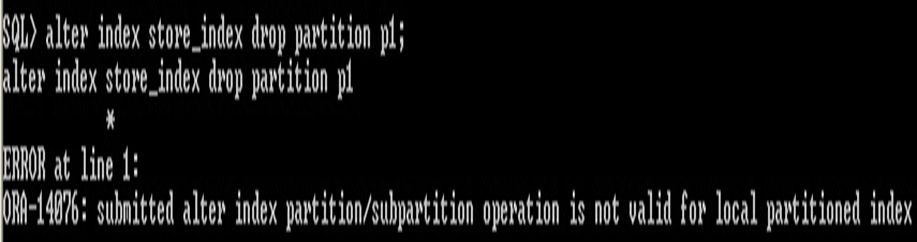
Drop local partitioned index
Dropping the Partition from the Local index is not allowed.
Instead of dropping from index, drop the partition from the table, it automatically drop the partition from the index.
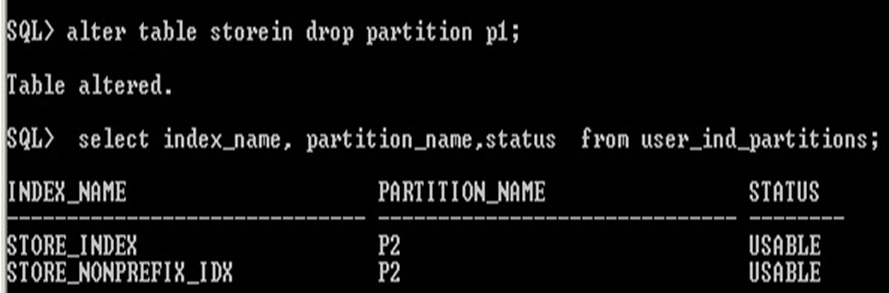
Dropping partition for index
4.9.2. Global Index
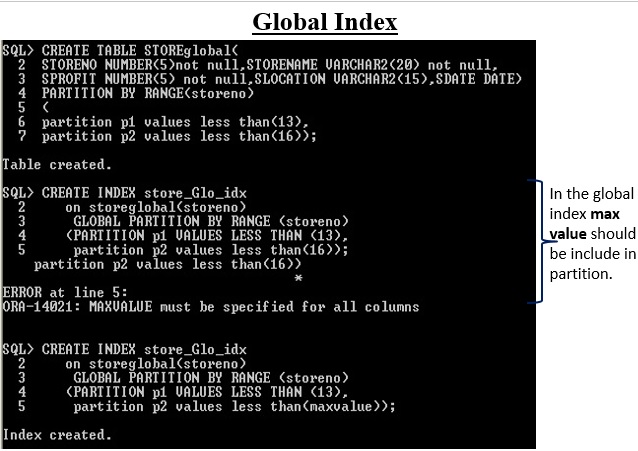
Global Index
Display the status of the global index
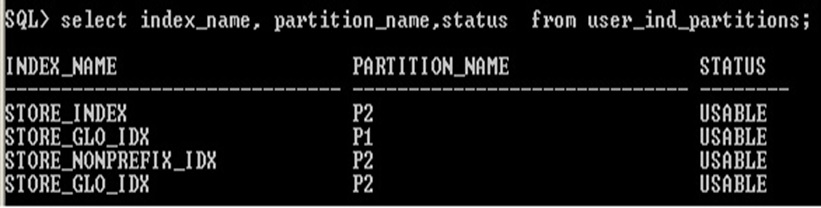
Status of Global index
Unlike local index, it is possible to remove or drop partition from the global index
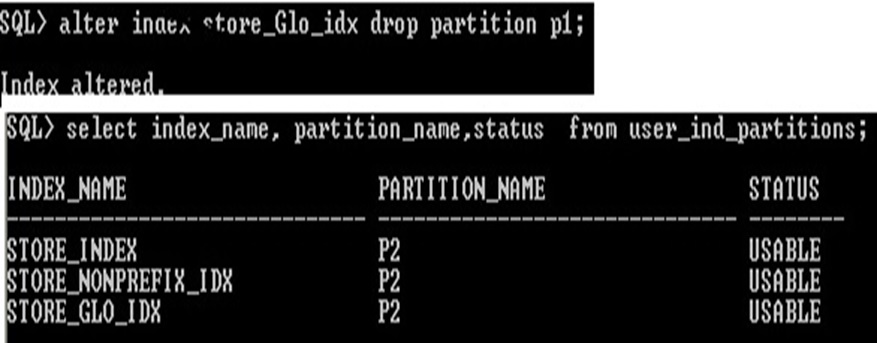
Global status info
Entire global index can’t be rebuild, only specific partition to be rebuild is possible.
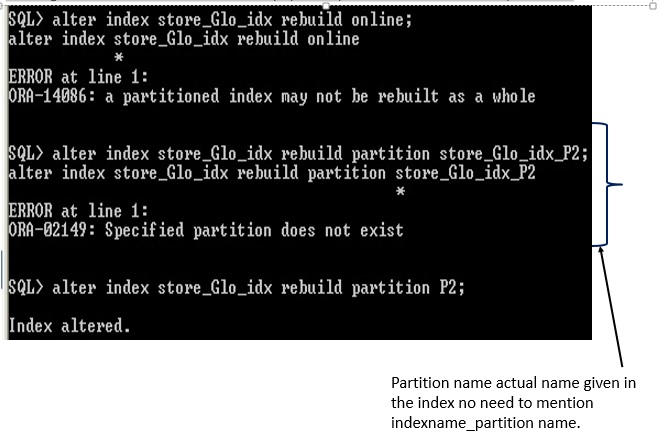
Rebuild global index
Unit summary
Practical Exercise
Plan Table
|
Plan_id |
Plan_name |
Plan_amount |
Expiry date |
No_of_sms_free |
|
1001 |
Group members |
Rs. 1000 |
10-Oct-2017 |
50 |
|
1100 |
Monthly gold plan |
Rs. 1500 |
12-Jan-2017 |
60 |
|
2100 |
SMS users |
Rs. 800 |
10-Apr-2017 |
100 |
|
2500 |
Student plan |
Rs. 300 |
5-Aug-2017 |
60 |
All the Below given exercise question use the plan table structure and values. While creating each table for partition purpose change the name of the table as Plan1, Plan2...etc.
1) Using the appropriate partition method to create Plan1 table which has two partition namely P1 and P2. The partition P1
stores the plan_id values upto 1500. The P2 partition stores the plan_id up to
2500. Display the table name, table space name, partition name and their
values. Include one more partition P3
which has any plan_id value which his any value which is greater than 2500. Change the name
partition P1 to P1500.
2) using appropriate partition method to create Plan2 table which has partition namely Pname1, Pname2. The Pname1 partition has values of plan_name "group members" and "monthly gold plan". The Pname2 partition has values "SMS Users" and "Student Plan". Display the partition Pname2 values. Remove the "student plan" value from the partition Pname2. From partition Pname1, the value "monthly gold plan" will store in new partition "plangold" and Pname1 stores only "group members". [Hint: use single st
3) Use appropriate partition method to Plan3 table which has three partition namely Planno1, Planno2 and Planno3 based on plan_id. Display only Planno2 partition. Reduce instead of three(3) partition to two(2) partition but content of the partition should be distributed to remaining partition.
4) Using Plan table create composite partition. The partition “R1” will store plan_id less than 1500 and partition “R2” store remaining Plan_id values. The sub partition based on plan_name values, the subpratition “S1” store “Group members, Monthly gold plan" values and another partition “S2” store "SMS users", "Student plan" values.
5) Insert all the records and display number of rows available in each subpartition.
6) Display the Values of S2 subpartition
Question
Video Tutorial
Part 1 Table Space
https://www.youtube.com/watch?v=CxUwTJt8SM0&list=PLV3NgZiVnUZnFLCvNm3M-Ggp8mL4LTh2e&index=1
Part 2 Range Partition Using Number
https://www.youtube.com/watch?v=xI6VudeCxOk&list=PLV3NgZiVnUZnFLCvNm3M-Ggp8mL4LTh2e&index=2
Part 3 Range Partition Using Alphabet
https://www.youtube.com/watch?v=BZ1R6G9U_-I&list=PLV3NgZiVnUZnFLCvNm3M-Ggp8mL4LTh2e&index=3
Part 4 Range Partition Using Date
https://www.youtube.com/watch?v=pg6WZg8Kt8E&index=4&list=PLV3NgZiVnUZnFLCvNm3M-Ggp8mL4LTh2e
Part 5 Add Partition
https://www.youtube.com/watch?v=FouPXimBfmA&index=5&list=PLV3NgZiVnUZnFLCvNm3M-Ggp8mL4LTh2e
Part 6 Rename Partition
Part 7 Merge Partition
https://www.youtube.com/watch?v=kvzrghobXTE&list=PLV3NgZiVnUZnFLCvNm3M-Ggp8mL4LTh2e&index=7
Part 8 Drop Partition
https://www.youtube.com/watch?v=7rw2m-goMiw&list=PLV3NgZiVnUZnFLCvNm3M-Ggp8mL4LTh2e&index=8
Part 9 - List Partition
https://www.youtube.com/watch?v=S1PRe2rEQ58&list=PLV3NgZiVnUZnFLCvNm3M-Ggp8mL4LTh2e&index=9
Part 10 Modify Partition Add List Values
https://www.youtube.com/watch?v=yXiUtTc8krs&list=PLV3NgZiVnUZnFLCvNm3M-Ggp8mL4LTh2e&index=10
Part 11 Modify Partition Drop values
https://www.youtube.com/watch?v=ANPHzS5JDek&list=PLV3NgZiVnUZnFLCvNm3M-Ggp8mL4LTh2e&index=11
Part 12 Truncate Partition
https://www.youtube.com/watch?v=BD7uxptgvK8&list=PLV3NgZiVnUZnFLCvNm3M-Ggp8mL4LTh2e&index=13
Part 13 Hash Partition
https://www.youtube.com/watch?v=9jAUVxO1wZk&list=PLV3NgZiVnUZnFLCvNm3M-Ggp8mL4LTh2e&index=12
Part 14 Coalescing Hash Partition
https://www.youtube.com/watch?v=BZwpvmzSmoU&list=PLV3NgZiVnUZnFLCvNm3M-Ggp8mL4LTh2e&index=14
Part 15 Move Partition
https://www.youtube.com/watch?v=uj0-EoiegHw&list=PLV3NgZiVnUZnFLCvNm3M-Ggp8mL4LTh2e&index=15
Part 16 Default value add list partition
https://www.youtube.com/watch?v=1UHTQK5iQzE&index=17&list=PLV3NgZiVnUZnFLCvNm3M-Ggp8mL4LTh2e
Part 17 Split Partition
https://www.youtube.com/watch?v=98hzieLJ2ow&list=PLV3NgZiVnUZnFLCvNm3M-Ggp8mL4LTh2e&index=18
Part 18 Drop Tablespace
https://www.youtube.com/watch?v=SralVkb7pU0&list=PLV3NgZiVnUZnFLCvNm3M-Ggp8mL4LTh2e&index=16
Part 19 Compare Truncate, Drop Coalsec
https://www.youtube.com/watch?v=JEEXKEHskHw&index=19&list=PLV3NgZiVnUZnFLCvNm3M-Ggp8mL4LTh2e
Lecture Notes
Lecturer Notes- OER Unit 4 Partition
References
1. https://www.morganslibrary.org/reference/partitions.html#rlp
2. http://www.acehints.com/2011/06/global-index-vs-local-index-difference.html
3. https://oracle-base.com/articles/8i/partitioned-tables-and-indexes