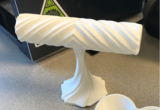
Make a 3D printed bracelet holder using files from Thingiverse, Cura, and a Lulzbot Mini 2 printer
- Subject:
- Engineering
- Material Type:
- Lesson Plan
- Author:
- Alexandra Houff
- Date Added:
- 04/19/2019
Projects related to 3D Printing, Tinkercad, Thingiverse, and other 3D modeling software

Make a 3D printed bracelet holder using files from Thingiverse, Cura, and a Lulzbot Mini 2 printer
Step by step instructions to print numbered dice for games using a 3D printer and TinkerCad design.
Design and create your own custom, 3D printed zipper pull! This project utilizes Tinkercad and some simple tools.
Students learn how 3D printing, also known as additive manufacturing, is revolutionizing the manufacturing process. First, students learn what considerations to make in the engineering design process to print an object with quality and to scale. Students learn the basic principles of how a computer-aided design (CAD) model is converted to a series of data points then turned into a program that operates the 3D printer. The activity takes students through a step-by-step process on how a computer can control a manufacturing process through defined data points. Within this activity, students also learn how to program using basic G-code to create a wireframe 3D shapes that can be read by a 3D printer or computer numerical control (CNC) machine.
Students design and develop a useful assistive device for people challenged by fine motor skill development who cannot grasp and control objects. In the process of designing prototype devices, they learn about the engineering design process and how to use it to solve problems. After an introduction about the effects of disabilities and the importance of hand and finger dexterity, student pairs research, brainstorm, plan, budget, compare, select, prototype, test, evaluate and modify their design ideas to create devices that enable a student to hold and use a small paintbrush or crayon. The design challenge includes clearly identified criteria and constraints, to which teams rate their competing design solutions. Prototype testing includes independent evaluations by three classmates, after which students redesign to make improvements. To conclude, teams make one-slide presentations to the class to recap their design projects. This activity incorporates a 3D modeling and 3D printing component as students generate prototypes of their designs. However, if no 3D printer is available, the project can be modified to use traditional and/or simpler fabrication processes and basic materials.
Blender 3D: Noob to Pro is a product of shared effort by numerous team members and anonymous editors. Its purpose is to teach people how to create three-dimensional computer graphics using Blender, a free software application. This book is intended to be used in conjunction with other on-line resources that complement it.
The City X Project is an international educational workshop for 8-12 year-old students that teaches creative problem solving using 3D printing technologies and the design process. This 6-10 hour workshop is designed for 3rd-6th grade classrooms but can be adapted to fit a variety of environments. Read a full overview of the experience here: http://www.cityxproject.com/workshop/
The project objective is to have students make a realistic 3-D model that is to scale. Student Mission: Your objective is to create a 3-D model of a building of your choice or imagination. The building must be to scale relative to an average-sized person. You make recreate a dwelling, barn or famous building OR create your dream home. Your building must be to scale and should be finished (windows, roof, shutters, steps, furniture, etc.). The outside of your building should include some surrounding features (e.g. bushes, trees, sidewalks, street, shed, etc.). Your final project should incorporate the elements listed on the rubric and be as detailed as possible. Be creative!
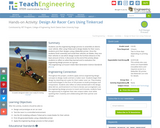
Students use the engineering design process to assemble an electric racer vehicle. After using Tinkercad to design blades for their racers, students print their designs using a MakerBot printer. Once the students finish assembly and install their vehicle’s air blades, they race their vehicles to see which design travels the furthest distance in the least amount of time. A discussion at the end of the activity allows students to reflect on what they learned and to evaluation the engineering design process as a group.
This is a lesson using Digital Age Skills in Upper Elementary 3D Design.
Original Author: Brandon Horst, Chadron
This series of lessons will teach all of the key features in Tinkercad, a free, web-based 3D design platform. When you have finished the lessons you will have a comprehensive knowledge of how to design/draw in 3D. After that all you need is practice to improve your skills.

A tutorial to learn the essential elements of Microsoft's 3-D Builder by building a coffee mug. Takes about 7-8 minutes to complete
This engineering design challenge is a great hands-on activity that utilizes the engineering design process, 3D modeling, and 3D printing technology. The challenge can be completed individually or in groups of 2 to 3. Students will work to complete the following challenge: Using the design process, design, document, model, and produce a toy car with interchangeable parts.
An instruction on how to print in multiple colors on a lulzbot mini 2

Learn how to use the Lulzbot Mini2 for 3D Printing.
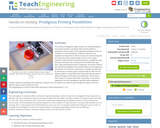
This activity is designed to give students an understanding of one aspect of what an engineer does and the ability to experience various steps in the engineering design process as it relates to a 3D printing task. Students transform into engineers as they work in teams to carry out a 3D printing task by using a blunt-tip needle syringe to print a line using a variety of colored liquid materials (shampoo, conditioner, aloe, and hand sanitizer) into a small plastic box filled with a gel base. Approximating the work of engineers, the teams observe the interactions between the printed material and the gel base at intervals of 10 minutes and iterate, or change, the ink base as necessary to achieve a goal. Using the dye to color the ink allows students to determine which material will permeate or diffuse throughout the base more effectively. Teams share their results to compare with their classmates. A real-world application for this investigation would be when engineers conduct research to develop new medicines, the goal is for the medicine to make its way through the body in the most effective way so that the body can heal.